Showing posts with label easy. Show all posts

Monday, September 26, 2016

NOBODY USES FLOOR WAX ANYMORE, RIGHT? YA GOTTA TRY THIS!

Y'know how expensive fluid acrylics can be? Or acrylic airbrush colors. Even the tiny little bottles aren't cheap. I made my own with the method explained below.

tutorial, mixed-media, manic
A fun experiment!
First, I mixed Liquitex tube acrylic in Prism Violet thoroughly with acrylic floor shine.

Guhin, art+blog
Go more opaque or
more translucent, as desired.
Be sure to get the mixture
as smooth as possible.
I should have strained mine, but didn't,
and it turned out okay!

Next, I poured the now-fluid acrylic paint into a clean,
empty eyeglass cleaner spray bottle.


THE PROJECT

Dr. Ph. Martin's Bombay India inks come in many colors, in a convenient dropper-stopper glass bottle. These highly pigmented India inks not only remain lightfast and permanent, but are also totally waterproof when dry. The colors are brilliant and transparent (except black and white).

My support was white Yupo, which I first sprayed with clear water. Then I added violet India ink in places. While that was still wet, I sprayed my homemade liquid acrylic in some areas. Silly me, there wasn't enough difference in the two colors (duh), so I grabbed orange airbrush acrylic to add a few accents.   

mixed-media, tutorial
I also splattered pure floor shine!
Adding droplets of clear floor shine at the end, but before the India ink is too dry, will create some cool effects.
I'll include this example, below, using Teal Bombay India ink diluted with water on Yupo. Then spattered with clear acrylic floor wax (the liquid). Then I used the ink bottle's dropper to add dark accents back in.

Guhin, how-to, tute
The India ink is repelled by the acrylic wax!


Tuesday, March 1, 2016

NO TIME FOR ART? BULL CRAP!

Here's another stab at a simple, grid-like
collage using up some of my
huge stash of painted papers.
I do prefer my earlier, very vivid example, shown at the link here, but this time I wanted to try a neutral collage with tan, beige, white, brown, black. As you can see below, I did not stick with the plan. That happens quite often!

art, project, Guhin
Use wallpaper, wrapping paper, old letters,
book pages as well as your own original papers.
I had also intended to further develop this work with stamped and scribbled additions, but nooooo. Go figure.
As my friend Lynn says, this could be a good warm-up exercise. Or a preview to test a composition!                
Thanks for your viewing! 

Monday, January 25, 2016

MIXED-MEDIA TIPS, TRICKS, & HINTS

This is my final post in the current series on handy suggestions.
See several more (previous) pages for more ideas!

 
Brushes straight up!:

The best way to store brushes after cleaning them is to get a nice-size block of green florist's foam. Stick the ends in the foam, leaving the bristles to stand on their own.  
art.painting, hint
Water drains from the ferrules this way!
Going straight:

When you want to paint straight lines, try an inexpensive pizza cutter. Thin the paint the same way you would for a liner brush, until it is an ink-like consistency. Roll the pizza cutter through it, then roll it on the canvas. Or try wooden skewers as painting tools. AND/OR the painted edge of a piece of cardboard. Cool!

art+blog, mixed+media

 
Mr. Clean Comes Through:
The "Mr. Clean Original Magic Eraser," which is mostly used for household purposes, removes dry watercolor paint if you first soak it (the magic eraser) in water, squeeze out the excess, and rub gently over the paper.

Painting tip:
Tone your canvas before use. This gives an immediate mid-tone to the painting, and you can start adding light and dark values right away. Or, if using gesso first, tint it first.

Make your own sepia paper:
To make beautiful, sepia-colored paper for art projects, soak sheets of heavy white papers in a casserole tray filled with warm, brewed coffee. Set sheets to dry on racks designed to cool baked goods. The cooling rack will leave an attractive design on the sheet -- to keep it plain, line racks with waxed paper. You may also wish to sprinkle sheets with the coffee grounds (to be dusted off later), leaving dark sprinkles of color.
 
MY PERSONAL THANKS to the followers who stick with me...I seem to take it hard when one quits, even knowing there are multiple possible reasons beyond control. DO let me know if you crave more mixed-media paintings, or assemblages, or whatever makes your little hearts beat faster. I live to serve.


Sunday, January 17, 2016

MORE IDEAS, TECHNIQUES, & MIXED MEDIA ADVICE

texture, mixed-media
Texture: A good way to break creative block is to collage rice papers and paper scraps onto heavy watercolor paper with matte medium. See the example above. After it's dry, use pastels, pencil, watercolor, acrylics, or whatever you wish to finish the piece!
 
Love those old wallpaper books!:
Ask for old swatch books free from the paint store, and use the vinyl samples as a support for various media. Oil pastels are great because you can layer and sgraffito the pastel and enjoy a bit of the background pattern showing through. See below.
tips, techniques
Oil pastel over vinyl, then scratched through.


art+blog, mixed-media
They DO look like china flowers!
Make your own “porcelain” flowers:
Believe it or not, these “porcelain” blooms are fabric flowers dipped in tinted plaster of Paris!
 
tips, mixed-media


 A cool technique with acrylics:
See my own above! I plan to use this cut up into pieces!
Create interesting backgrounds with rubber cement, to keep certain areas white. First, apply some rubber cement and let it dry, paint a color and let dry, apply rubber cement in an interesting pattern and let dry.  Do again with another color. When that’s dry, pick up or rub off the cement across the entire piece, and see what is underneath.
(I did the one shown above 4 or 5 times on a single white surface, and needed elbow grease to remove all the rubber cement!)
 
Lefties:
For left-handed artists...turn your spiral bound sketchbook upside down and work from the back of the book. The spirals will be on the right side and not interfere with your hand.
 
A fun exercise to motivate you:
When you need inspiration, try the two-hand method. Pick up a different-colored marker or colored pencil in each hand and draw something—or nothing! Move both hands at the same time, alongside each other in a similar pattern. You'll be amazed at what your non-dominant hand can produce. A great warm-up tool.

mixed-media, tips, techniques


Monday, December 14, 2015

Two Examples of Fabric Resist

Fabric Fun Made Easy!
We've said it before, working the resist technique can be COOL, whether on canvas, paper, or other fabric. See links below to MORE posts with MORE resist methods!

Resist, technique, Mixedmediamanic
Blue school glue on washed cotton fabric.
Let the resist material dry before washing colors
over the design. Then wash the school glue out after the permanent paint or ink dries!

Thin tar gel
If you want to try this
with kids, fluid acrylic
medium can be used
(with paint shirts on!).
Intense, vivid watercolors
are a good substitute for
permanent colors.

I luuuuve this tempera resist project, below: http://mixedmediamanic.blogspot.com/2015/08/white-tempera-resist.html
and this one, too! http://mixedmediamanic.blogspot.com/2015/04/more-techniques-with-citrasolv.html

Our recent contest was won by jusaweecatnap, who should kindly and privately email me with her postal address in order to claim her prizes!

MY THANKS TO ALL OF YOU WHO VISIT THIS SITE! HAPPY HOLIDAYS.

Wednesday, November 11, 2015

A TWOSOME OF BACKGROUND IDEAS

For your collage or mixed-media works, here's
an easy, quick dynamic duo.
 These ideas work well not only to serve as backgrounds but also as decorative papers to be torn or cut and added as needed.
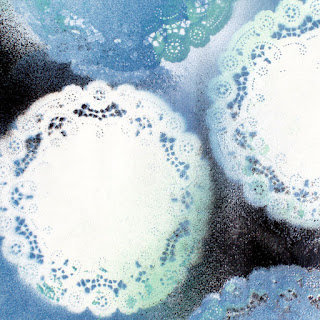
First up is a method so simple it's almost embarrassing! Paper doilies or crocheted or lacy fabrics make great stencils for spray paint. And you can use the painted materials later!
collage, how-to
Remove some, add some, and spray again!
Wallpaper makes a wonderful start or mixed media material. Attach a sheet of it to a substrate if you wish to fill in a background fast. The floral below was embellished with painted flowers and stems. It's not a finished artwork in my view, but  I'm saving it for possible future use. I can picture torn pieces coming in handy, maybe.
Guhin, mixed-media
Ask your paint dealer for a discontinued wallpaper book or two!

Saturday, June 6, 2015

NOT MIXED MEDIA WITH TRANSPARENCIES AGAIN!?!

(My apologies in advance for those of you who prefer your mixed media without the addition of transparencies.)
I find copies so versatile and fun that I've experimented endlessly with them in many guises. I've also posted about them in this space numerous times, so please bear with me if you've been a long-time follower.
NOW FOR TODAY'S PROJECTS!
technique, art+activity
I printed this out on my home computer.
I used an original
leaf photo of my own,
altering it in Photoshop
for a very colorful
background.
TIP: Note the
white spaces,
necessary for this
activity. Also remember
that your own
background cannot be
too terribly dark, or
you will lose contrast.

Next, I altered a
photo portrait to
pure black (and
clear), very
graphic (no gray).
I printed that 
transparency, P.Guhin, how-to
Try other backing sheets too! Sooo fun.
onto transparency
film, and lay it
over the colorful
background image.


Below, another idea!
I merely used soft
pastels to create a
gradient effect on good paper the same
size as my transparency (of a person on a dock, framed by foliage). Then I just sandwiched them together. So simple and yet, I think, quite striking.
tutorial, technique, Guhin  
Some of you might prefer more color in the sky.
PRIZE AWARDED TO A FOLLOWER! For those who participated in last week's contest,
the winner is Julie Mortillaro. Congrats to her, and
my sincere thanks to the others. Julie, please
privately send me your usps mailing address.

Sunday, May 17, 2015

CREATE GORGEOUS PAPERS WITH THIS TECHNIQUE

I had some black tagboard and the urge to experiment!
Any black or dark surface will work with this method: how to make lovely metallic paper for collage or backgrounds or whatever you wish. (TIP: Tape the paper down!)
You'll also need interference paints (acrylics) and a crackle medium.
P.Guhin, how-to
I tried another crackle brand too, and it worked as well!


First, mix just one of your interference paints in a small container with water to thin it, and set aside. I did not do that with the gold paint, and it was too thick to work, as you will see later.
Next, apply crackle medium thickly to the black substrate, and work fast so it doesn't dry before the next step.
technique. art+blog, Guhin    
This is just the wet crackle medium on black.
Then quickly drip the thin interference paint into the wet surface. It will spread and maybe even separate a bit. 
how-to, tutorial, method, technique
The gold paint didn't work because it was too thick!

Thanks for following my blog!
 

Sunday, April 26, 2015

MORE TECHNIQUES WITH CITRASOLV

I tried more methods of creating visual texture with CitraSolv on magazine papers...these decorative papers can be used in collages, mixed-media paintings, and more. Previous posts with tips on using CitraSolv can be found here and here!
method, technique
With the one shown above, I covered the entire page (taken from Elle magazine) with a thin coat of CitraSolv concentrate, and used the large-size bubble wrap, pressing it well into the solution. Then I just let it sit overnight!
Here's one, below, made with bubble wrap with smaller bubbles, and a page from Lucky magazine.
art+activity, how-to
Is this one your favorite too?


Next, I used plastic wrap, pushing and shoving it
into big wrinkles on the solution. See below.
Guhin, tutorial, CitraSolv
This one was done with a page from Bazaar.

Finally, I had a bottle of the blue school glue (it's washable), and I used it as a mask or a resist, let it dry overnight, and then rubbed with a CitraSolv-soaked cloth to remove the ink that wasn't protected. See above.

There's a section with examples of CitraSolv papers in the book, Creating Decorative Paper.

Thanks for viewing this post! (Let me know
if you're inspired to try some of these ideas.)

Friday, March 20, 2015

SCRAPING & SCRIBBLING - Fun with Transparencies

I've discussed "bad" photos in this space before. Here's a great way to rid yourself of distracting backgrounds and add some great doodling, which is always fun.

First, I printed out my own, original photograph (below) on transparency film.

Guhin, transparency
LOVE these flowers...Birds of Paradise!

Then I used a scratch tool to scrape away the background, working on the emulsion side.
Next, a fine permanent marker or two (in black), and I really enjoyed this part!
Tips for variations: Try colored markers if you wish, or metallic ones. And try both wide and thin tips!
I mounted mine over white paper, but you could use colored art paper instead...oooo!

photography, transparency, scratch
Note that I left selected elements of the original background, too.

Thanks for viewing this post!


Thursday, February 12, 2015

CHIC-ER SNEAKERS - COLORFUL & TRENDY!

THIS POST IS A DEPARTURE,
BUT ONE MIGHT CALL IT ALTERED ART.
 
I bought a plain, white, very inexpensive pair of tennis, and didn't even wash them first.
Should have, I suppose, but too excited to DO this!
P.Guhin, tutorial
I used fluid acrylic inks and paints, which are of course permanent when dry.
decorative, Guhin
I did not use the mossy green at all.
Then I gathered my small paint brushes and--oh joy, what a blast painting the random shapes!
tutorial, P.Guhin
I used primary colors.
art, activity, Guhin
Yes, I will actually wear these!
Guhin 


Saturday, January 10, 2015

MATERIALS FOR DIFFERENT MIXED MEDIA EFFECTS

Elsewhere on this art blog I have previously discussed a number of media and common household products to create many textures and to use with a wide variety of techniques. See plastic food wrap here, and masking fluid here.


art+materials, Guhin, effects
You can even use rubber cement as a resist material!
You can imprint designs with fabrics, too! Below are a few other techniques to remind you of the possibilities!
Today we'll use water-soluble media (liquid watercolors, fluid acrylics) on cold press watercolor paper which I taped down and pre-wet with water.
In the first example, I washed in deep color and placed wooden sticks in it at once. Then I let it dry with the sticks in place.   
tute, technique
The wooden dots did not work!


tutorial. painting
Ok, MY result isn't terribly good.
Try other items! You'll have better luck!
Another technique: Scratch into wet paper before washing color over...the broken fibers absorb color differently than the rest of the paper.   
painting, how-to
This method is good for scribbles, lines, grasses....
Thanks for viewing this post!


Sunday, May 18, 2014

IMPRINTING: A GREAT WAY TO ADD VISUAL TEXTURE!

USE FLUID PAINTS TO TRANSFER PATTERNS

(P.S., The winners of yesterdays's giveaway were Gil in the UK and Susie! Congrats to them.)

The imprinted paper shown below was done with damp watercolor paper, a sheet of glass, and a crocheted piece. I pressed the lacy fabric to the paper before flooding it with intense watercolor. Then I quickly put the glass on top and a heavy book on that! The next day I removed the "sandwich."

method, how-to
Not a finished work, but paper to be used in collage - mixed-media.


For the "fishy" painting, I cut a plastic bag into curvy shapes
(see the light, fish-like forms below) and lay them on the damp
paper first. They stuck there and formed a type of resist. You could
also use shards of glass or Plexiglas.
texture, tutorial
I used a fishnet...how appropriate!

Friday, January 24, 2014

LESSONS STRICTLY FOR ART TEACHERS & PARENTS!


This is the first in a series of fast and fun drawing activities 
for kids,beginning with line.            

Here you'll find drawing prompts that are authentic and economical, foolproof and fun. These are experiences in creating two-dimensional works of art with "dry" media, not paint or glue. No elaborate preparation is required!
            These ready-to-use lessons are easy-to-follow, step-by-step instructions for children in elementary and middle school. They allow young artists to work on their own with the adult as a facilitator only.  They're tried and tested, meaningful tasks to engage the interest of the creative kid.
            You'll discover that the fifteen-minute marvels in this series are a convenient, educational way to use short periods of time productively.  And most of the artworks can be finished in about a quarter-hour or less.
            We begin with the fundamentals in the first posts—the basic art elements. Each post will highlight a different component. Line, the principle factor in drawing, is the focus of this first section.

            A word about pencils: A common 2B pencil will suffice for most drawings. However, for deep, dark gradations and shadows, try a special 4B or 6B. An HB (or any H pencil) is too hard for softly blended shading effects.

Line: a continuous mark made by a tool onto a surface.                                          
TO THE LETTER
art lesson, art teacher, student
Materials:
·        White drawing paper, pencil &/or other drawing tools
 Have you ever looked at the lines and shapes of alphabet letters and pictured other things? You can “see” a snake in the letter “S” if you try!
What to do:
  1. Lightly draw a letter—either capital or lower-case—on a large piece of paper.
  2. Squint your eyes and imagine the letter as part of something else. Draw in new lines and shapes, and add more on to it to finish the letter-picture. 
Questions to Ask Yourself:
            Is the artwork as complete and interesting as you could make it? Could you draw a number instead of a letter, and make it part of a brand-new picture?
lesson, student, art

TAKE A MARKER FOR A WALK
Materials:
· White drawing paper, markers 
What to do:
1. Draw a shape (an animal, a person, a flower, or any other outline) in the center of a large sheet of paper. Shapes are made by enclosing an area with a line. 
2. Next, "take a marker for a walk" around the shape, as closely as possible without touching it. The marker line should go all the way around the first shape, until it touches the place where it began. Then choose a different color marker and create another outline just outside the first, and then another, and another, without touching the other lines. If you can, use markers of different thicknesses, too. Some wide, some thin. Draw around the shape again and again until the page is filled with lines!

For Your Understanding:
       When you repeat lines over and over, you make a rhythm, a regular pattern that lends a feeling of movement. Did you begin with an interesting shape? Did you fill the page with many lines?

WHAT CAN THESE LINES BECOME?
Materials:
·        White drawing paper, pencil &/or other drawing tools
What to do:
  1. Lightly draw a squiggle on a large piece of paper. (See those below.) The line can be curvy or sharp and all angles.
  2. Squint your eyes and imagine the squiggle as part of something else. Draw in new lines and shapes, and add more on to it to finish the picture. 
activities, art,
NOTE: You mixed-media artists out there, please remember that, besides this series of kid's art activities, I will continue to post material just for you!
Paula Guhin, MixedMediaManic
Thanks for stopping by!


Saturday, August 24, 2013

TRINKETS, JEWELS, & CHARMS: ALTERED ART JEWELRY

We've been adorning ourselves with found objects for thousands of years. The baubles in this post are accessories with a conscience. Jewelry can be made from repurposed paper, plastic, glass, wire, rubber, fabric scraps, bungee    cords, rope, metal washers, and much more.

 To make your own, unique bangle (below), you'll need colored papers in the hues of your choice. I used craft glue and snippets of magazine papers (and a coat of varnish) to take a tape roll from refuse to reuse! 
mixed media, craft
This handmade bracelet began as a nearly-finished roll of masking tape.

All you need to make a slip-on, unisex wristband or cuff are …
recycled art materials

handmade, recycled  … a soft, flexible old belt, superglue, scissors, and a metal ring.


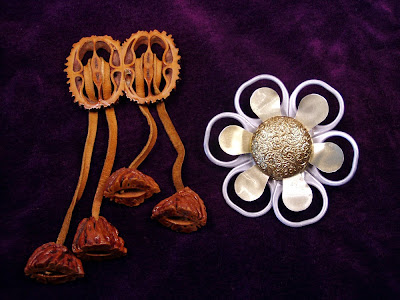
Folk art jewelry by anonymous crafters:   The pin below at left makes use of walnut shells, and the pin at right is made of pop tabs.             

homemade pins
Rustic jewelry made with humble materials.

Next week, MORE altered art jewelry from recycled materials!