Showing posts with label beginner. Show all posts

Sunday, December 22, 2019

Make Your Own Animal Print Sneakers (& More!)

ACRYLIC PAINT and INEXPENSIVE WHITE TENNIES = EASY COW-PRINT SHOES

 I'm seeing a lot of cool athletic shoes, dressier ones too, with zebra, leopard, and other prints. So this idea came to me to embellish plain white canvas shoes with black acrylic paint. 


I used a ratty, stiff old brush to create the effect of animal hairs.
 
 Four years ago I posted several other, similar ideas. See below. 
Splat!
I used a sponge dauber, of course.
Thanks for viewing this craftsy post. Please check in again for a step-by-step tutorial on an assemblage!

Sunday, February 5, 2017

BACK TO THE DRAWING BOARD: BASIC FORM

Many Art I students or absolute beginners at the high school level require a great deal of practice when learning how to shade forms. That said, I’ve assigned to eighth graders the two exercises described here. And nearly every one of them enjoyed triumph with both! Performing the tasks required of them, my students, um, drew on their knowledge of essential art concepts.
It was fun to go loopy and bundle up, too!   
how-to, art+element
This might be too challenging for fifth or sixth graders.
GETTING STARTED   Before class, I had cut white drawing paper into 4.5” x 12” strips, one for everybody. Using transparent tape, I affixed one end of a paper strip to a drawing board to show the students how to start. Then I twisted or curved the strip toward the center and fastened that portion down, too. A final bump or curl, taped down at the paper’s end, makes the form even more interesting. I asked the class to create their own unique, "unboring" forms directly on their desks, but to leave work space on their desks for themselves!  

Before my demonstration on the board, we held a discussion on the element of form, with emphasis on its three-dimensionality and the use of light and dark to depict that. Then I drew an enlarged sketch (outlines only) of my bendy, taped-down example for everyone to see.

I passed around several finished works to exemplify our objective. My own shading on a whiteboard didn’t have the quality I wanted, so I used a piece of 18” x 24” white drawing paper and charcoal instead. Nattering away about values, gradations, and hills and valleys, I smeared charcoal from dark to light to transform my outline drawing into a form with mass. Then the kids began their own works with soft pencils, and I was able to walk the aisles to assist. I directed the artists to include the cast shadow on their desks, to ground their subject.
Guhin, art+blog
A form that takes up space!
I reminded the students to try to use their blackest blacks and their lightest grays—a full range of values. The class members were reminded of several fundamentals with the “wavy strip” lesson. ART TIP: Imaginative kids might poke a hole in their paper forms. I had one who even left a pencil in!

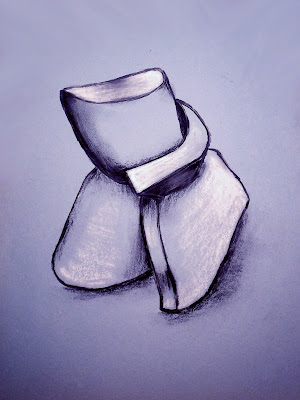
A BUNDLE OF FUN The second, related activity is best for another day, especially if class time is only 40 minutes or so. I had been given scraps of flexible foam rubber padding, so I shared a piece with each student. I instructed them to squeeze and squash their foam any way they wanted, and then tie a piece of string tightly around the bunched-up form.
tute, how-to, draw, form
Charcoal and white chalk on blue paper.
They could roll it, pinch it, and fold it any which way before tying it into an interesting form, but they should keep in mind that they would be drawing the bundle! If it was terribly complex, they could be quite challenged.

WE BEGAN very lightly with charcoal pencils on light blue construction paper.  But you could use any toned paper (not too dark), even brown wrapping paper! Following the contours of their bundles with their eyes, class members completed line drawings first.

Then we modeled the sketches with shading, just as we had done in pencil shading the drawings of the wavy paper strips. Again, including in their drawing the shadow cast on their desks was part of my message. “It helps to anchor the drawn form to the page.”
Guhin, MixedMediaManic
Ask a carpet-layer or re-upholsterer for foam scraps!
Lastly, here’s the reason for the toned paper: We added highlights anywhere the light would strike, especially the rounded tops of bulges. That finishing touch helped to illustrate the volume of the forms very well.
MATERIALS
  • White and toned drawing paper
  • Soft drawing pencils
  • Transparent tape
  •  Charcoal pencils
  • Upholstery foam scraps or carpet foam padding
  • String or rubber bands
  • White chalk or white pastels
LEARNING OBJECTIVES: to earn the importance of drawing what they see by using the elements of form and value, & to create a realistic work of art presenting the illusion of mass.

Sunday, July 27, 2014

PROPORTIONS OF THE FACE - A Guide for the Novice

  1. First, draw an egg shape. The chin portion should be more narrow than the crown.
  2. Believe it or not, the eyes must be placed nearly halfway down! (Especially if you're drawing a young person.)
                                         how-to, tutorial, tute
3. In the lower half of the face, divide the space into thirds (with the bottom of the chin being the bottom of the final third). The bottom of the nose is at the bottom of the first third, and the bottom of the lower lip as at the bottom of the second third. These are only approximate proportions, of course.
 
4. The ears in the front view should not protrude too far. The top ear tip is about at the eyebrow, and the bottom of the ear lobe is about even with the bottom of the nose.
 
5. Don't forget to add a neck, and not too thin, either!
 
Finally, add lots of strokes for the hair. TIP: Youngsters often begin the hairline too low on the forehead. Don't do that!


Wednesday, March 26, 2014

PhotoMontage Rainbow!

So colorful! So graphic! So easy that kids can do it!

photography
High-key photograph, black and white.


First, you need a high-contrast black and white photo image.
 
      Load a photocopier with three or four colors of copier paper. Lighter colors work better, but brights are outstanding! 
    tutorial, art book, art lesson
    My beloved Arab stallion, missed greatly.
    • Sandwich the copies together and cut strips either vertically or horizontally (but not both). TIP: Vary the widths of the strips for added interest.  
    • Another TIP: Lay the pieces down in the correct order!
    • Alternate colors as you glue the strips  to a sturdy substrate. (Yes, you'll have enough leftover strips to do this project two or three more times!)      
    art book, P.Guhin
    Do the strips detract from the photo? Maybe, but it's fun!
    Find many more exciting photo-art activities in this new book, pictured below!
    
    Paula Guhin
    Available Here!
    Paula Guhin


    Sunday, February 2, 2014

    KIDS' DRAWING ACTIVITIES FOR ART TEACHERS AND PARENTS, PART III

    P.Guhin, art blog
    Note how the shading adds depth to the leaf.
    SKETCH A LEAF
    Materials:
    ·        White drawing paper
    ·        Ballpoint pen or fine-line marker
    ·        A real leaf

    BLOB-DOODLES
    Materials:
    ·        Copy of the image below (or make your own)
    ·        Pencil and/or other drawing tools
                Have you ever gazed at clouds and imagined you could see the shapes of animals, people or more? We can get ideas for creating art from inkblots, too.
    What to do:
    1. Study the blob-shape below and see what images come to mind.
    2. Turn the paper in different directions and discover the hidden figures, faces, animals, and objects you can draw there.
    3. Add details to the many pictures you find
    Questions to Ask Yourself:
                Did you find a variety of things to draw? Variety is a principle of art that means “different, not all the same.” Did you fill all of the space well?
    beginner, art, drawing
    How many hidden images can you find here?

    FABULOUS FOOTWEAR
    Materials:
    ·        White drawing paper
    ·        Pen or fine-line marker
    ·        A shoe or pair of shoes

    What to do:
    1.      Shoes make a great subject for contour drawings. Place your shoe (or a pair of them) on the desk or table. Look very closely at the shoe, following all the edges with your eyes.
    2.      With a pen or a fine-tipped black marker on a large sheet of paper, draw all the edges you see. No pencil allowed! Look back and forth many times between your paper and the shoe.
    3.      Be sure to add the details—all the openings, seams, and designs. Remember to draw only lines! Since the shoe is not flat, your drawing should not be a strictly side view.      
    Questions to Ask Yourself:
                Is your drawing complete? Did you include details such as laces, buckles, straps, stitching? If the proportions (relationship of the parts to one another) aren't quite right, try again on another sheet of paper.
                                                                              
    NO PEEKING!
    Materials:
    ·        White drawing paper
    ·        Pencil or other drawing tool
    ·        A “screen” such as a large book

                Blind contour drawings are practice sketches that are called "blind" because you can't look at your drawing until you're done! Contours are single lines that define forms. Blind contour drawings help train your eyes to see edges as you draw. They may look strange, but they'll help you become a better artist.
    What to do:
    1. Choose an interesting subject.  Objects with lots of edges, folds, or other details are best for this exercise. Is there a person in the room who can pose for you?
    2. Set up a “screen” (a large book works well) in front of a large sheet of paper.
    3. Place your pen or pencil on your paper. You can look to make certain your starting point gives you enough room so you don't draw off the edge of the paper.
    4. Study the person or thing and draw very slowly. Don't look at your drawing! You are training your eyes to see and your hand to record every detail correctly. Don't lift your pencil or pen—just drag it around the paper when you need to draw a different shape.
    For Your Understanding:
                Your finished drawing probably appears quite weird to you, but try several more blind contour drawings of the same object. It's good practice!

    Wednesday, January 29, 2014

    MORE DRAWING ACTIVITIES FOR KIDS

    Part Two in an ongoing series just for young artists and those who love and care for them.
    (Mixed media artists, please watch this blog for something tailored to YOU, coming soon!)

    activity, art, drawing
    Note how the nails are set into the nail beds that surround them.
    HAND IT TO YOU
    Materials:
    ·        White drawing paper
    ·        Pen or fine-line marker

    What to do:     
    1. Rest your left hand on the desk—if you're right-handed—and not on the paper. The hand is to be observed, not traced. No pencil allowed! Use contour line (a line that follows the edges) to record the outlines of your own hand. As you look closely at this "object," move your marker in the same way your eye travels over the shapes and lines you see.
    2. Draw all the tiny creases, the knuckles, and the skin around the nails, too. This is a very loose approach, so move your whole arm freely, not just your wrist and drawing hand.  Allow your pen or pencil to travel fluidly.  Add shading if desired.
    For Your Understanding:
                Try posing your hand differently for another contour drawing. You can even hold a pencil or other small object in that hand to add more interest to your work.   


    FROM WHERE YOU SIT
    Materials:
    ·        White drawing paper
    ·        Pen or fine-line marker
               
                Quick, look down! What do you see? Your legs and feet may be partially or entirely in sight. Your clothing is creased or rumpled in places, isn't it? Each fold is another opportunity for you to practice using contour lines (drawn lines that mark the edges of forms).
    What to do:
    1. Draw what you can see of your lower body, including the feet.
    2. Try to include every detail. Start right out with pen or marker (no pencil, please!). 
    For Your Understanding:
                The contour line drawing method is perfect for this lesson because it allowed you to focus on the outlines of your figure.   

    WITH A STRAIGHT FACE
    Materials:
    ·        White drawing paper
    ·        Pencil or other drawing tool
    ·        Ruler

                Let's pretend to be Picasso! Can you portray a human head, neck and facial features using only straight lines?
                Cubism is a style of art that sometimes uses angled shapes to depict natural forms. Pablo Picasso was one of the first Cubists. In abstract art, the subject is broken down into its basic elements.
    What to do:
    1. Use a ruler and only straight lines to draw a portrait (a person) with no curves at all.
    2. Besides the eyes, nose, and  mouth, remember to add ears, hair, eyebrows, and a neck\ 
    For Your Understanding:
                By making the head and neck more simple in your drawing (by changing it into mere straight lines), you have abstracted it! 

    P.Guhin

    Friday, January 24, 2014

    LESSONS STRICTLY FOR ART TEACHERS & PARENTS!


    This is the first in a series of fast and fun drawing activities 
    for kids,beginning with line.            

    Here you'll find drawing prompts that are authentic and economical, foolproof and fun. These are experiences in creating two-dimensional works of art with "dry" media, not paint or glue. No elaborate preparation is required!
                These ready-to-use lessons are easy-to-follow, step-by-step instructions for children in elementary and middle school. They allow young artists to work on their own with the adult as a facilitator only.  They're tried and tested, meaningful tasks to engage the interest of the creative kid.
                You'll discover that the fifteen-minute marvels in this series are a convenient, educational way to use short periods of time productively.  And most of the artworks can be finished in about a quarter-hour or less.
                We begin with the fundamentals in the first posts—the basic art elements. Each post will highlight a different component. Line, the principle factor in drawing, is the focus of this first section.

                A word about pencils: A common 2B pencil will suffice for most drawings. However, for deep, dark gradations and shadows, try a special 4B or 6B. An HB (or any H pencil) is too hard for softly blended shading effects.

    Line: a continuous mark made by a tool onto a surface.                                          
    TO THE LETTER
    art lesson, art teacher, student
    Materials:
    ·        White drawing paper, pencil &/or other drawing tools
     Have you ever looked at the lines and shapes of alphabet letters and pictured other things? You can “see” a snake in the letter “S” if you try!
    What to do:
    1. Lightly draw a letter—either capital or lower-case—on a large piece of paper.
    2. Squint your eyes and imagine the letter as part of something else. Draw in new lines and shapes, and add more on to it to finish the letter-picture. 
    Questions to Ask Yourself:
                Is the artwork as complete and interesting as you could make it? Could you draw a number instead of a letter, and make it part of a brand-new picture?
    lesson, student, art

    TAKE A MARKER FOR A WALK
    Materials:
    · White drawing paper, markers 
    What to do:
    1. Draw a shape (an animal, a person, a flower, or any other outline) in the center of a large sheet of paper. Shapes are made by enclosing an area with a line. 
    2. Next, "take a marker for a walk" around the shape, as closely as possible without touching it. The marker line should go all the way around the first shape, until it touches the place where it began. Then choose a different color marker and create another outline just outside the first, and then another, and another, without touching the other lines. If you can, use markers of different thicknesses, too. Some wide, some thin. Draw around the shape again and again until the page is filled with lines!

    For Your Understanding:
           When you repeat lines over and over, you make a rhythm, a regular pattern that lends a feeling of movement. Did you begin with an interesting shape? Did you fill the page with many lines?

    WHAT CAN THESE LINES BECOME?
    Materials:
    ·        White drawing paper, pencil &/or other drawing tools
    What to do:
    1. Lightly draw a squiggle on a large piece of paper. (See those below.) The line can be curvy or sharp and all angles.
    2. Squint your eyes and imagine the squiggle as part of something else. Draw in new lines and shapes, and add more on to it to finish the picture. 
    activities, art,
    NOTE: You mixed-media artists out there, please remember that, besides this series of kid's art activities, I will continue to post material just for you!
    Paula Guhin, MixedMediaManic
    Thanks for stopping by!


    Saturday, February 2, 2013

    EASY MARBLING TECHNIQUE WITH SHAVING CREAM

    CALL IT WHAT YOU MAY, TO MARBLEIZE OR TO CREATE A MARBLING EFFECT IS EASY!
    This is a simple, lovely way to make your own decorative paper.

    Supplies and Materials:
    • Large shallow pan (but I used a sheet of aluminum foil!)
    • Cheap shaving cream
    • A spatula and/or a knife
    • Alcohol inks (or experiment with fluid acrylics or other inks!)
    • White or light-colored papers
    How To:
      shaving cream, marbling, how to marble
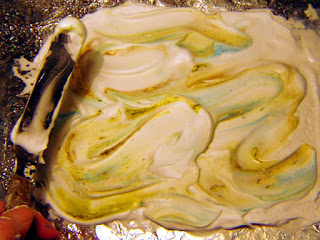
    • Spread a layer of shaving cream about the size of your paper.

    • Dot the ink or inks of your choice on top. Here I used alcohol inks, below.
    shaving cream method

    • Cut the knife through the shaving cream and the dots, dragging them into a swirling pattern.
    shaving cream, marbling effect
    By using the spatula FLAT, I rather messed up!


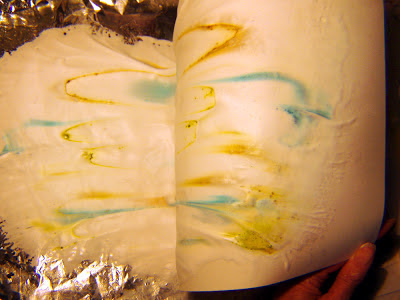
    • Lay clean paper over the design and press down for good contact. Let sit for a moment. Then peel the paper off from one edge to the other. 

    tute, tutorial, easy lesson
    Alcohol inks may provide less graphic results.

    marble, shaving cream method


    • You will need to scrape off the excess shaving cream. SAVE the excess with the remainder of your used shaving cream, and you can do it all over again with more ink dots and another sheet of paper!
    art lesson, easy, simple, marbleize

    art blog, mixed media blog, Paula Guhin


    Saturday, August 18, 2012

    Using Value in a Color Scheme

    The Definition of Value
    The value of a color is based on how light or dark it is. The easiest way to remember this is to picture a "grayscale," which runs from black to white with all the possible light, middle, and dark grays in between. The lighter the color, the higher its value. So a deep, royal blue is a lower value than a light, sky blue (a high value).
    using values with color

    Tip: An artist might find it helpful to use a variety of values in a single artwork, including white (or nearly white) and black (or nearly so).

    Note: The scales below don't illustrate the lowest values (the colors with  lots of  black added).

    high value, middle value, lower value, value scale
    mixed media blogmixed media manic

    Tuesday, June 19, 2012

    MAKE A GORGEOUS ACRYLIC SKIN! How to Create a Swirly Embellishment

    This lesson is so easy that even a child could make something beautiful! When it's thoroughly dry, use the acrylic skin as a collage element in a painting.

    You will need :
    1. a disposable plastic or aluminum container 
    2. acrylic gel medium, glossy (thinned to a smooth, creamy consistency) or tar gel
    3. liquid acrylic colorants (I like airbrush colors)
    4. eyedropper or other tool to drip colorant
    5. feather or other tool to drag through
    
    make a collage element, create a skin, marbleize, tutorial
    Acrylic Skins are Easy to Make
    

    Pour the acrylic medium into the container (I used the cover of a CD pack, since they are too nice to throw away!). 

    Then drop the colors of your choice here and there. Use a brush, a bottle with a nozzle, or an eyedropper to place the drips.

    Next, drag a tool through the medium, swirling the colors as you go. Do as much or as little marbleizing as you like. The acrylic medium dries quite clear, but it takes a day or three, so be patient, set the container aside, and wait.

    I removed the circular shape I made quite easily when it was dry enough, by picking at one edge with a sharp tool and simply peeling it up. The shapes you make can be cut with scissors, too!

    Monday, April 16, 2012

    HOW TO IMPRINT LEAVES WITH DYE & MAKE SOMETHING BEAUTIFUL!

    This project is so easy, and yet the results can be very striking! 
    Use the papers as artworks in themselves, or as backgrounds or collage elements in other works.


    MATERIALS:

    1. Absorbent, smooth watercolor paper
    2. Liquid fabric dyes
    3. Leaves with prominent veins
    4. Pane of glass or plexi, and heavy books
    PROCESS:

    1. Arrange a variety of leaves (different sizes and shapes) on a pre-dampened sheet of watercolor paper. Add a few grasses here and there if you like.
    2. Flood the paper with vivid, beautiful colors of liquid fabric dye. (Liquid watercolor paints or inks work, too.) Select a few colors, lighter and darker, that work well together.
    3. Place the sheet of glass on top, and a heavy book to weigh it down. Let dry overnight. Try several of these, since results can be mixed.
    [cool colors]


    Be sure to check out my previous post on how to select a fabulous colour scheme! And please see my photo blog on Tumblr, I Luv Photography!
    Saturday, January 28, 2012

    PAINTING PAPER: A PANOPLY OF FUN METHODS!


                                            The sampler pictured above is from the book Creating Decorative Paper

    Painting with Rollers or Brayers 

    This technique is simple and effective. The results can be stunning.

    A brayer is a printmaking roller that's very handy for creating special effects on paper or canvas, but you can use a regular old paint roller or a sponge or foam roller, too.
    1. Spread old newspapers on your work surface. 
    2. A large piece of glass or plexi (with the edges taped for safety) can serve as the flat surface upon which to spread your paint or printing ink.
    3. Roll the brayer in the paint/ink until it's well-covered thinly, not too juicy.
    4. Roll a straight or curvy application on your paper of choice. Repeat. Leave some areas unpainted if you wish.
    5. Add a different color to the glass and mix it with the previous color if desired. Or clean the brayer and the glass and try another color entirely.
    (Here, a few sparkles of the original white paper have been left untouched...er, unrolled!)
    I plan to post several more easy variations using paint rollers very soon, so please check back!  

    Thursday, December 15, 2011

    Art Activity for Kids

    All you need for this fun project are some colored markers and some clear acetate. The markers can be either water-based or permanent. Cut the acetate into small rectangles (1.5" x 2") , and give two or three of them to each child.


    Have the kids make mini-designs of their choice on each rectangle. Tell them that the more lines and shapes they fill in, the better!


    Then mount the mini-creations in slide mounts, and either import them into a computer with a slide scanner or put on an actual slideshow the old-fashioned way, with a real projector. Popcorn and music would go nicely with your presentation.


    Friday, October 7, 2011

    ART ACTIVITY WITH KIDS or for anyone, really!

                                 Squirt, Squish, and Squeegee! 
    This elementary art project is so fun and so cool, adults will want to try it, too. 
    It leaves a lot to chance, but the results can be serendipitous and gorgeous. Best of all, there's no mess and no clean-up!
    Materials:
    • White illustration board or foam core, 8x10"
    • Tubes of cheap acrylic paints
    • Small squares or rectangles of matboard or cardboard
    • Clear adhesive shelf liner

    Technique:
    1. If you're working with a roomful of youngsters, have them sign their name on the back of the cardboard or foamcore first!
    2. Have them help each other (or use an assistant) to squeeze out three or four colors of paint on the cardboard, somewhere near the center but not touching each other. Let the kids choose their own color combos. Tell the kids to use no more of one color than they would put on their toothbrush if the paint were toothpaste. (This sounds silly, but remind youngsters that the paint is not edible.)
    3. Again, help younger kids or let them help each other with a piece of see-through adhesive shelf liner that has been cut large enough to cover the 8x10" board. Start peeling the sticky paper at one end and attach that to the board, then cover the entire board, right over the paint blobs. Try to press as you go, to avoid big air bubbles. (Note: clear acetate can be substituted for the stick-on plastic, since the paint will eventually dry at the edges and adhere the acetate to the board.)
    4. Now for the really fun part! Grab a small square of cardboard or matboard and spread the paint beneath its plastic covering. Press hard. It mixes the colors where they meet, and makes for exciting whorls, waves, and octopus shapes. Other tools that move the paint around under its covering include credit cards, hair combs, putty knives, and tile adhesive applicators.
    If some of the white background shows through in a few places, it's likely a good contrast with the paint. If you want to keep messiness at a minimum, be sure the children stop expanding their paint designs before they squeeze them right out of the edges.
    One of the great things about this lesson is that the kids can take them home the same day. But you'll want to display them first, because they are so interesting and gorgeous!