It was fun to go loopy and bundle up, too!
 |
| This might be too challenging for fifth or sixth graders. |
GETTING STARTED Before
class, I had cut white drawing paper into 4.5” x 12” strips, one for everybody.
Using transparent tape, I affixed one end of a paper strip to a drawing board
to show the students how to start. Then I twisted or curved the strip toward
the center and fastened that portion down, too. A final bump or curl, taped
down at the paper’s end, makes the form even more interesting. I asked the
class to create their own unique, "unboring" forms directly on their desks, but
to leave work space on their desks for themselves!
Before my demonstration on the board, we held a discussion on the element of form, with emphasis on its three-dimensionality and the use of light and dark to depict that. Then I drew an enlarged sketch (outlines only) of my bendy, taped-down example for everyone to see.
I passed around several finished works to exemplify our objective. My own shading on a whiteboard didn’t have the quality I wanted, so I used a piece of 18” x 24” white drawing paper and charcoal instead. Nattering away about values, gradations, and hills and valleys, I smeared charcoal from dark to light to transform my outline drawing into a form with mass. Then the kids began their own works with soft pencils, and I was able to walk the aisles to assist. I directed the artists to include the cast shadow on their desks, to ground their subject.
 |
| A form that takes up space! |
I
reminded the students to try to use their blackest blacks and their lightest grays—a
full range of values. The class members were reminded of several fundamentals
with the “wavy strip” lesson. ART TIP: Imaginative kids might poke a hole in their paper forms. I had one who even left a pencil in!
A BUNDLE OF FUN The second, related activity is best for
another day, especially if class time is only 40 minutes or so. I had been
given scraps of flexible foam rubber padding, so I shared a piece with each
student. I instructed them to squeeze and squash their foam any way they
wanted, and then tie a piece of string tightly around the bunched-up form.
 |
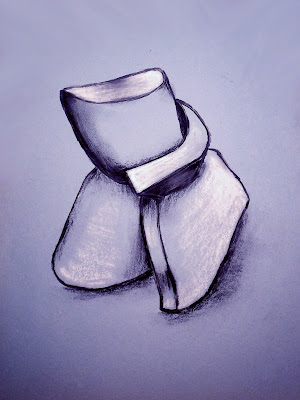
| Charcoal and white chalk on blue paper. |
They
could roll it, pinch it, and fold it any which way before tying it into an
interesting form, but they should keep in mind that they would be drawing the
bundle! If it was terribly complex, they could be quite challenged.
WE BEGAN very lightly with charcoal pencils on light blue construction paper. But you could use any toned paper (not too dark), even brown wrapping paper! Following the contours of their bundles with their eyes, class members completed line drawings first.
Then we modeled the sketches with shading, just as we had done in pencil shading the drawings of the wavy paper strips. Again, including in their drawing the shadow cast on their desks was part of my message. “It helps to anchor the drawn form to the page.”
Lastly,
here’s the reason for the toned paper: We added highlights anywhere the light
would strike, especially the rounded tops of bulges. That finishing touch
helped to illustrate the volume of the forms very well.
MATERIALS
MATERIALS
- White and toned drawing paper
- Soft drawing pencils
- Transparent tape
- Charcoal pencils
- Upholstery foam scraps or carpet foam padding
- String or rubber bands
- White chalk or white pastels
LEARNING OBJECTIVES: to earn the importance of drawing what they see by using the elements of form and value, & to create a realistic work of art presenting the illusion of mass.


very cool !
ReplyDeleteMeera, I need another guest post...are you up for it so soon?
DeleteSorry -- just saw this -- had been away traveling. Sure - let me know what you are thinking about :) Thank you for considering me !
ReplyDelete