Showing posts with label ink. Show all posts

Saturday, October 12, 2019

I'm Back & Painting, Playing with Mixed Media, Creating Assemblages & More!

 Holbein inks and Sennelier shellac-based inks are fun to work with. I wanted to create some cool collage papers with them.
 
The 13 Holbein drawing inks are waterproof and come with droppers in the screw-on tops. Some are transparent, some opaque.
Sennelier shellac-based inks have a transparent, satin finish and thin with water, if you can believe that!

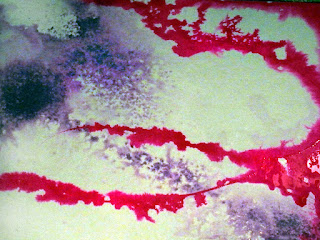
For the first example shown below, I worked on acrylic paper from a pad, spraying a little purple fluid acrylic from a spray bottle. Then I used the applicator tip of the Carmine color of Holbein ink. It's a powerful pigment! Then I let that dry.

tute, tutorial, how-to
I actually liked this first step better than the result later.
Next, I created a few puddles of rubbing alcohol and added alcohol ink. The effect, shown below:
Guhin, blog
I do like the colors together.

Thanks for viewing Mixed Media Manic!
 
(Full disclosure: This post is derived from a much earlier one. And new stuff is coming, I promise.)

Wednesday, October 19, 2016

MASKED MONOPRINTS & WAXY TRANSFERS

TWO BRIGHT IDEAS TO TRY! 
MASKING with flat paper cut-outs enhances this
first technique, monoprinting. I usually roll
water-based printing ink onto a sheet of
Plexiglas and draw or scrape designs directly
on that surface. I used rubber tips and many
other scraping tools to make lines, shapes,
and patterns.

TIP: Work quickly so the ink doesn't get too
dry.

 Then add the paper masking shapes, which                            
you could prepare ahead of time if you know
what your theme or motif is.
 
Lay the paper shapes on top of the still-wet
ink, wherever more white is to be preserved.
Place the sheet of printing paper onto the
inked, designed surface. Press all over the
back with the flat of your hand. Peel the
Guhin, copyrighted, blog
I used oil pastels on this monoprint.
print off, let dry.
While the black-and-white
prints have graphic appeal,
they’re even more delightful
when partly colored. Use
dry media when the print is
thoroughly dry: colored
pencils or pastels (oil or chalk).
However, if you printed with oil-based ink or acrylics,
the print is not water-soluble and you can colorize
with inks or watercolors!

Guhin, art, blog, tute
This page spread appears in the November issue of Arts & Activities
Magazine, which any visual arts educator should have!

IMAGE TRANSFER with waxed paper is exciting. 
Computer images that are graphic and black &            
white work best on the waxed paper.                                 
 
The final print will be reversed.

First, the computer image must be no larger
than 8.5” x 11.”  Cut both smooth watercolor
paper and waxed paper to that size, too.
Then dampen the watercolor paper with
water and wipe it off, because too much
water will make the print blur terribly.
Set that aside but don't let dry too much.
 
To prevent wrinkles or jamming the printer,
scotch tape the waxed paper smoothly to a                                                
sheet of printer paper at the top. 
how-to, tute, tutorial
Image transfer on waxed paper.
Or use repositional adhesive spray at the top end.
Either side of the waxed paper works.

Feed the sandwich into the printer and print.
 
TIP: Definitely use an inkjet printer.

Don’t be alarmed by the “faint” print you get
on the waxed paper…it’s supposed to look like
that! Gently lay it ink-side down onto the pre-
dampened watercolor paper. Holding the
waxed paper firmly down so it doesn’t move,
press all over with your hand. Then carefully
Guhin, art+blog
Watercolors on sealed print.
lift the waxed paper. It will still have ink,
so be careful not to drag it.

These prints are water soluble,
so colorize with dry media only.
Or spray the print with
clear acrylic when dry,
let that dry too,
then add watercolors or inks.
 
Both techniques are easy and fun to do,
so I hope you enjoy them.


Saturday, April 6, 2013

HOW TO MAKE A COLLAGRAPH PRINTING PLATE


A printmaking plate can be created much 
as is a collage, by gluing relatively 
flat materials to a surface. 

The resulting prints are called collagraphs. 
The basic principle behind a collagraph 
is that of relief printing.

Some artists distinguish between a "collage relief print" and a collagraph, the latter of which is then termed an intaglio print. (If the collaged plate is inked up and then wiped of most of the ink on its uppermost surfaces, it is then run through an etching press with dampened paper. Recessed areas or indentations in the plate hold the ink and thus print on the paper.) Some printmakers combine both methods, intaglio wiping and rolling surface color onto the plate.

For our purposes, we'll refer to collage relief prints as collagraphs. Materials with different surfaces and textures are assembled on a flat base (called the plate). The base is often made of Masonite, wood, sheet metal, or heavy cardboard. Objects in low relief are first glued to the rigid backing. The heights of the various materials should be somewhat similar--there shouldn't be too much difference in elevation. Put down newspapers or plastic to shield the work area.


tute, create a collagraph print
Simple collagraph printing plate before being inked up and used.

Possible Materials for Collagraphs:
Woven fabric
Lace
Doilies
Rickrack
Embroidery
Braid
Buttons
Toothpicks
Clock parts
Gaskets
Sandpaper
Coins
Textured wallpaper
String
Feathers
Washers
Flat rubber pieces
Mesh
Corrugated cardboard
Screening

Flattened plants

When the glue is dry, you can make the printing plate more long-lasting
with a coat of gesso, varnish, or acrylic medium. (Varnish is a protectant,
usually clear, that may also affect the sheen of the surface.)

When the sealant has cured, select a soft but strong printing paper.                                         

Printing the Relief Plate: 

Water-based block printing ink cleans up easily later. Squeeze ink onto a glass slab and smooth it out with a brayer. Ink up all the raised areas on the collagraph plate evenly with a brayer (an ink roller) . Varied heights require careful inking. If you miss any areas, try daubing ink on the printing surface with a brush or a piece of felt.
Quickly place a clean sheet of printing paper on the inked surface. If the paper is thin, cover it with another sheet of paper before you begin rubbing. Press over it with your fingers and the flat of your hand, gently rubbing to transfer the ink to the paper. Take care to keep from tearing the printing paper. Finish by rolling a clean brayer over the paper with as much pressure as possible without damaging the paper. Peel the paper carefully from the plate and set aside (or hang it up) to dry.

The printing plate is usually, but not always, re-inked for each impression. Sometimes enough ink remains on the plate that another print, a "ghost" image, can be made.

Variations include making a multi-colored print by inking up various parts of the plate in different colors, or printing only some elements separately on the same sheet of paper. You can even add more color by hand after the print is dry! 

found objects
The same plate was printed 4 times on one paper.


(For an interesting and unusual result, overprint several different collagraph plates to create a single artwork on the same sheet of paper.)


Paula Guhin
art blog

Friday, February 3, 2012

Painting with a Roller, Part II

The first example is similar to one shown in my last post, done with a hard rubber printmaking brayer (or a foam roller). Remember, you can curve or zig-zag as you roll on the ink or paint.


The next photograph, below, demonstrates the use of a cheap foam roller to which I took a pair of scissors! Just cut out gouges here and there in the foam, at random or symmetrically. Then ink up the roller evenly on a pane of glass or on a flat sheet of metal, plexi, or china. Use block printing ink, acrylic paint...even tempera will work (but it won't be permanent).
Here, I allowed each color to dry before proceeding with the next, but how about THIS for an idea: Ink your roller with two different colors, one on each side, and roll them simultaneously? Choose colors that work well together.

What an easy way to create decorative papers!


Saturday, January 28, 2012

PAINTING PAPER: A PANOPLY OF FUN METHODS!


                                        The sampler pictured above is from the book Creating Decorative Paper

Painting with Rollers or Brayers 

This technique is simple and effective. The results can be stunning.

A brayer is a printmaking roller that's very handy for creating special effects on paper or canvas, but you can use a regular old paint roller or a sponge or foam roller, too.
  1. Spread old newspapers on your work surface. 
  2. A large piece of glass or plexi (with the edges taped for safety) can serve as the flat surface upon which to spread your paint or printing ink.
  3. Roll the brayer in the paint/ink until it's well-covered thinly, not too juicy.
  4. Roll a straight or curvy application on your paper of choice. Repeat. Leave some areas unpainted if you wish.
  5. Add a different color to the glass and mix it with the previous color if desired. Or clean the brayer and the glass and try another color entirely.
(Here, a few sparkles of the original white paper have been left untouched...er, unrolled!)
I plan to post several more easy variations using paint rollers very soon, so please check back!  

Monday, July 4, 2011

DECORATIVE PAPER MADE WITH INK AND TURPENTINE

I put down a layer of dye-based ink on a non-absorbent white sheet of paper. While the ink was still damp, I ran a brush through it, here and there, that I had soaked in turpentine.
This is the effect I achieved!

Friday, June 10, 2011

TWO EASY WAYS TO MAKE DECORATIVE PAPER

Both these methods are so simple, and fast too! Well, the second technique has some drying time, but it IS quick to make.


Deli wrap adds translucence to this first idea. I photographed it with some lacy black  paper underneath (in the upper left corner) to show how sheer it is.


I simply used water and alcohol inks to create a random, distressed-looking design.


The second method requires sturdy paper or card. Use a painting knife to apply either texture paint (as shown here), molding paste, or heavy gel medium.


While it's still wet, embed tiny beads. These red ones are very small no-hole glass beads. I also used antique gold glitter, which looks white in the photo below.

When dry, seal with clear fluid acrylic medium.

Thursday, June 2, 2011

TISSUE, PAINT, AND INK COLLAGE

STEP 1: Roughly paint your subject matter on sturdy paper. I used tempera! I also created positive shapes by painting in the negative Let dry.


STEP 2: Cut out tissue paper shapes and adhere them to the painting, overlapping in places. I used liquid acrylic medium. Remember that some tissues are very fragile and will likely tear. Don't worry about any wrinkles that might form. Coat the piece with medium to seal. Allow to dry.


STEP 3: Add accent lines with ink and a fine brush, or with markers. Use black or dark colors.