Showing posts with label how-to. Show all posts

Thursday, April 2, 2020

MIXED MEDIA COLLAGE - PAINTING ON CANVAS

I WOULD LOVE A NIFTY TITLE FOR THIS NON-OBJECTIVE WORK.

GOT A TITLE SUGGESTION 

FOR THIS NEW, MIXED-MEDIA WORK?

STEP-BY-STEP FROM SKETCH TO FINISHED PROJECT

MY ORIGINAL SKETCH...I thought it would be horizontal!

I wanted a limited color scheme of cream, light and dark gray, and cool red in a variety of values. I used acrylic paint, textured papers, my own decorated papers and more.

The photo shown below is in progress.  I goofed by leaving a very dark area in the center.

At this point I hadn't yet decided to finish the piece as if it would hang vertically.
The finished work.

Note (above) the several small, brighter accents as focal points. 

Please comment if you have a good idea for a name for this. 

Or if you like it!   THANKS!

Tuesday, March 24, 2020

HOW TO PAINT A TIE-DYE EFFECT ON CANVAS SHOES

PAINTING FOOTWEAR WITH A SPLASHY TECHNIQUE
 
Look closely to find where I forgot to remove some tape before taking the photo.
MATERIALS:
Shoes
Tape (masking)
Water
Brushes
Fluid acrylics
A palette
A flow aid (optional)

I used inexpensive canvas tennies (trainers? sneakers?) in white, 
but any light color will work.
First, tuck the laces inside the shoes.

Tape off the outsole if you don't want to get paint on it.
 

For a soft, tie-dyed effect, wet the canvas first with clear water 
(I used a clean paint brush).
 I applied the acrylics (mixed with a flow aid) with the tips of
brushes, working quickly before the canvas dried.


 When I was done, I upended the shoes onto heavy tumblers
and let them dry thoroughly.
I hope this has inspired you to try your own fancy footwork!

Monday, March 9, 2020

DID YOU MAKE A MISTAKE? 2 TIPS FOR REMOVING IT.

 FIX YOUR GOOFS!
HOW TO CLEAR DRY ACRYLIC PAINT FROM AN AREA
(TWO POINTERS TO HELP CLEAN  UP AN ERROR IN YOUR PAINTING)
Yes, you can cover mistakes with gesso or collaged materials. 
But here are two reminders of other techniques for different effects.

TIP #1: Sandpaper! See photo above.
It removed dry acrylic paint quite easily.

TIP #2: Pour on some rubbing alcohol and let it sit awhile.
Then rub with a dry cloth. See lighter areas above.

Thanks for viewing.
 

Thursday, January 16, 2020

FROM A MIXED MEDIA IDEA TO AN ACRYLIC PAINTING

Don't you love a brand new, snow white canvas? Especially when it's stretched, primed, and deep! I've read that all that whiteness is intimidating to some, but it inspires me to try something different. 
I wanted to do a cityscape for a change, 
but my grand idea flopped.
I had planned this artwork as a collage/painting 
with lots of interesting artsy papers combined with
a very wet, blended sky. I thought the watery acrylics 
would contrast nicely with the hard edges of cut paper pieces.
I  used dioxazine purple, Quinacridone Violet, Indian 
Yellow, Titanium White, & a few other colors that I 
mixed from leftover acrylic paint I had on hand. I 
liked the idea of a complementary color scheme...
& purple is the complement of yellow. (Also, 
yellow-green is the opposite of red-violet!) 
To enhance the wet-on-wet effect, I used a floating medium.
Flow release medium works much the same way.

I extended paint to the sides too.


Art ideas can change as you go along.

Yep, I had cut a variety of textured
and painted papers, but as I arranged
them on the canvas I realized that
they were too precise and perfect for my
"messy," loose, freely painted portions. 
I painted the buildings & more, including a   
few shadows, and then stamped in lines,  
shapes, & textures. See below,
though I want to do more to it.  
   
   I hope you'll try a cityscape if you haven't
   already. If you want to create a collage that's
   not too tight and hard-edged, 
   consider torn papers. 


Saturday, January 4, 2020

NOT A PAINTING: EX VOTO ASSEMBLAGE

YOU CAN BUILD AN ASSEMBLAGE WITH HEART
I'm happy to take you through my process, especially since this shrine or construction is very dear to me. I knew and loved a young man who was on the wrong path, wild and a bit rowdy sometimes. He nearly died in a car crash, and was left with head injuries. (He's much better now, many years later, thankfully.)
Here you can see a toy car and small head in the upper part of the photo.
I based this new  assemblage roughly on a
votive offering placed in a church or shrine
as thankfulness for a miracle received.
Mexican retalblos are small oil paintings, generally made
on tin. An ex voto is a votive offering to
a divinity, usually Christian. Read more  about them here:
(click on this link)  https://en.wikipedia.org/wiki/Ex-voto

  Materials I used:
Strong, clear adhesive 
Wooden shelf, picture frame, and small box
Found objects (many are pictured below)
Discarded beads
Acrylic paints: Diox. purple, Quin. red and Quin. gold,
    Mars black, Titanium white, and Ultramarine blue. 
Copper patina
I decided against some of these objects and altered others.
  Traditionally written (usually at the bottom) are inscriptions, names, dates, and stories of miraculous recoveries and escapes. I chose not to do that.
For more history on ex votos and info on modern, current ones, click here:
http://www.mariolinasalvatori.com/understanding-ex-votos/
This might have been where my friend had gone if he had died years ago.


Here's a close-up, below, of the broken, burnt glass that sits below the devil.
I also put rusty barbed wire just below 
that (not too visible, sorry), and again 
where "Hell" ends, just below the car and boy.
Here you can see the beads and the costume jewelry pin.

My recent assemblages might seem a little sinister
to some of you...I mean, Medusa? Now this!
But I have always loved icons and myths.
Have I gone to the dark side? 
What's your opinion? I'd love to know.
Below is a link to a much sillier assemblage
that I created quite a long while ago.

BELOW, A FULL VIEW OF THE FINISHED PIECE!

Do you think this is appropriated art? 
I'd love to hear your comments! This was a love project for me, and
I feel I've put my own, original stamp on the artwork. And I didn't include any inscription or a saint although I do have religious elements in the top half of the piece.  (There is also an image you can't see of a saintly figure, in the dark, under the hand.) 
Do you find it too depressing or ominous, with the devil and horns?  

I do need a title for this piece, so if you have a good idea, 
please let me know!
Thanks for viewing this post. I appreciate you.   ---  Paula


Monday, December 9, 2019

FLUID ART, POURED PAINT, FUN TECHNIQUE


I tried pour painting for the first time!

If you haven't used this technique before, study up on it first. I'm always jumping in head first and I also experiment, a lot. So my first two results, below, are mixed, but I did enjoy the effort.

Here are some of the materials you'll need:
  • Canvas surface and acrylic paints
  • White gesso
  • Plastic or rubber gloves
  • Paint pouring medium
  • Silicone oil (a medium that helps make "cells," which are soooo cool!
  • Plastic cups with lids to keep paint wet
  • Craft sticks for mixing
  • Squeeze bottles for more pour control (optional)
  • Paint brushes to touch up and embellish pours
  • Plastic drop cloths (or many, many layers of newspapers or butcher paper) 
Set your canvas on a jar to raise it up.
I used cobalt blue, a yellow-green, and a metallic blue-green for my first pour. I also substituted some pure pigment medium for some of the pricey pouring medium, in the spirit of exploration. (It's a Createx transparent base.) I had to add water, too, so the mixture would be thin enough. The pouring paint must not be too thick!!! 
My first finished fluid art.
Again, with my tendency to NOT follow rules, I added some Createx extender
to the second attempt, and even used an old, painted canvas as my base,
rather than a new, gessoed canvas. 
I also added  "Cell Magic" (silicone oil).
The heat I added didn't create cells, but I like the crackle effect.
 I do recommend that you read other instructions
 and see some videos if you are serious about trying this painting effect. 

Thanks for viewing this post. I always appreciate followers of this blog. 
Paula


Tuesday, December 3, 2019

ASSEMBLAGE, FOUND ART OBJECTS, SCULPTURE, STEP-BY-STEP

I've been a fan of myths and legends since I was a child. Medusa, especially, caught my fancy.
She was a Gorgon, but before that she was a beauty. Raped by Poseidon, cursed by Athena, she was said to have wings. One of her sons was the winged Pegasus.
I always have a concept in mind before I begin.
I also prefer to build upon a structure or support.
Below I've pictured a few of the materials I
gathered ahead of time. Didn't use them all!
 
The costume pin reminded me of snakes!
I often change my plans as I go. Materials not shown are an old rubber ball and a metal ball-chain necklace that "fancied up" the edges later. Of course I also used paints (acrylics) & adhesives.
I cut the doll's rubber "hair" off and
affixed the ball to the face, to serve
as forehead and top of head. When
dry & secure, I punched holes in the
"scalp" and glued in the toy snakes.
The baby-doll face was waaaay too
cute, so I created her unsightly nose
and mouth from molding paste.
I adhered the lovely face image looking down at Medusa, and placed her in a bubble of glass (slightly domed, from a small picture frame).
 Below is a detail of the topmost part. Note the blue eyes on either side of the "turned-to-stone" figure--because, you know, MEDUSA!
The horse's wings came from a composite angel.

Another close-up, below, of the 2 key-chain "snakes."  
On the two outer sides, I made marks: ancient Greek symbols.
They seemed too obvious until I partially obscured them.

This "junk art" can be either a tabletop piece or wall-hung.     
Most of the materials were either discards or thrift-shop finds.
  
In need of more assemblage art inspiration? There are many more examples on this site.


Saturday, November 9, 2019

NEW COLLAGE - PAINTING step-by-step

Learn how I created a mixed-media artwork in sequence!

I began with a used canvas, barely gessoed with thin, watery white gesso so the unwanted painting below would show through somewhat.

Rough blocking out of the lowest and highest values is always a good idea, at least for me. You can always change your mind later, but this gave me an idea of my layout.
Step 1
Next, I mixed a blue-gray acrylic paint and applied mid-tones. 
Pointer: Always strive for balance, even at an early stage.
Step 2, some mid-tones added.
 Then, collaged papers and text, and a small, real feather.        
I also stamped pattern to create a few bright accents.        
Petroleum jelly can be applied selectively (I used streaks) 
to protect previously-painted areas. Make sure that the   
paint is dry before you apply the resist (the petroleum   
jelly). Then paint over that with a contrasting color.   
Let THAT paint dry, then wipe off. A really cool effect!
    
THIS FINISHED WORK, BELOW, IS DONE IN A TRIADIC, PRIMARY COLOR SCHEME.

"Temporary," by yours truly, Paula G.


Thanks for viewing this post! I appreciate it.


Sunday, October 27, 2019

Wide Acrylic Painting with Several Techniques

I HAD A WIDE CANVAS
and wanted to paint over the previous work.
 
First I did a quick, light wash over most of the unwanted painting with diluted white gesso.


When dry, I painted thick swatches of paint as shown below.
Work quickly now!
 I used Pthalo blue and burnt sienna liquid
airbrush colors, fluid transparent
 Pyrrole Orange, and a couple other
purple and blue colors.
 
Next, before the paints could dry, I used a spray bottle of water, and tilted the canvas to encourage blending and running.
Blue and orange are complements.

Painting techniques that might enhance this piece are spattering, blown ink lines, and/or freehand mark-making. 


Sunday, October 20, 2019

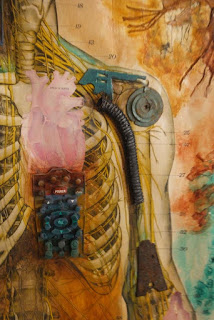
VINTAGE ANATOMY CHART AS COLLAGE BACKGROUND

I altered a large, old school science chart & it was fun!

This mixed-media project was a blast to complete. I used acrylic paint, other mediums, metal bits, clockworks, fibers, found images, and so much more. (See the finished work following some details.)
 
Coils & gadgets & more!
(Detail.)
The organic shapes of rubber bands (see directly below) reminded me of cells or organs inside the body.      
Detail.
Another close-up.


Fibers & pics from an anatomy book.
(Detail.)

At last, here's the completed piece, below.
 
 
Thanks for viewing! - Paula