Showing posts with label decorated paper. Show all posts

Thursday, July 2, 2020

SALE! GET THIS AWARD-WINNING ART BOOK (NEW! Never used!) FOR CHEAP ON ETSY!

HOW-TO FOR BOTH ADULTS AND KIDS!
HUNDREDS OF FULL-COLOR PHOTOGRAPHS TO INSPIRE YOUR CREATIVITY.
Use the many techniques and ideas in your own mixed media art, journaling, even for scrapbooking.
My Etsy shop is called guhinp, and here's the link to the book:
 

Thursday, April 2, 2020

MIXED MEDIA COLLAGE - PAINTING ON CANVAS

I WOULD LOVE A NIFTY TITLE FOR THIS NON-OBJECTIVE WORK.

GOT A TITLE SUGGESTION 

FOR THIS NEW, MIXED-MEDIA WORK?

STEP-BY-STEP FROM SKETCH TO FINISHED PROJECT

MY ORIGINAL SKETCH...I thought it would be horizontal!

I wanted a limited color scheme of cream, light and dark gray, and cool red in a variety of values. I used acrylic paint, textured papers, my own decorated papers and more.

The photo shown below is in progress.  I goofed by leaving a very dark area in the center.

At this point I hadn't yet decided to finish the piece as if it would hang vertically.
The finished work.

Note (above) the several small, brighter accents as focal points. 

Please comment if you have a good idea for a name for this. 

Or if you like it!   THANKS!

Saturday, October 12, 2019

I'm Back & Painting, Playing with Mixed Media, Creating Assemblages & More!

 Holbein inks and Sennelier shellac-based inks are fun to work with. I wanted to create some cool collage papers with them.
 
The 13 Holbein drawing inks are waterproof and come with droppers in the screw-on tops. Some are transparent, some opaque.
Sennelier shellac-based inks have a transparent, satin finish and thin with water, if you can believe that!

For the first example shown below, I worked on acrylic paper from a pad, spraying a little purple fluid acrylic from a spray bottle. Then I used the applicator tip of the Carmine color of Holbein ink. It's a powerful pigment! Then I let that dry.

tute, tutorial, how-to
I actually liked this first step better than the result later.
Next, I created a few puddles of rubbing alcohol and added alcohol ink. The effect, shown below:
Guhin, blog
I do like the colors together.

Thanks for viewing Mixed Media Manic!
 
(Full disclosure: This post is derived from a much earlier one. And new stuff is coming, I promise.)

Tuesday, March 1, 2016

NO TIME FOR ART? BULL CRAP!

Here's another stab at a simple, grid-like
collage using up some of my
huge stash of painted papers.
I do prefer my earlier, very vivid example, shown at the link here, but this time I wanted to try a neutral collage with tan, beige, white, brown, black. As you can see below, I did not stick with the plan. That happens quite often!

art, project, Guhin
Use wallpaper, wrapping paper, old letters,
book pages as well as your own original papers.
I had also intended to further develop this work with stamped and scribbled additions, but nooooo. Go figure.
As my friend Lynn says, this could be a good warm-up exercise. Or a preview to test a composition!                
Thanks for your viewing! 

Monday, February 8, 2016

USE UP YOUR PAINTED PAPERS IN A PATCHWORK COLLAGE

You have them...you know you do...saved pieces on which you experimented, or scraps from failed works. Maybe you even keep papers on which you've tried out colors or wiped your brush!
This tutorial describes my own, simple method for creating a quick collage. Use it as fun inspiration, motivation, as a lesson for kids, or perhaps even to make a serious finished artwork! You can also add mark-making if you feel some areas need more. OR you might borrow from the finished design to compose a painting!


tutorial, how-to
A "Primary-ly" red, yellow, and blue color scheme.
1. Go through your stash of your own, original decorative papers. You might already have a color scheme in mind...I did! Gather them together, and check to see if you've included a full range of values from near-black to white. TIP: No need to stick with brights, as I did...all neutrals are terrific for this. Or complementaries like orange and blue, or whatever grabs you!
collage, tutorial, MixedMediaManic
Not a collage, just a sampling of papers, but I sorta like it.
2. I went with cut edges and geometric shapes, although torn, organic shapes work too. Aim for a variety of sizes (and shapes). Arrange on a sturdy support and audition a number of compositions before gluing anything down. Strive for balance! And unity! Are there some similarities and some differences? Is the finished collage harmonious? HAVE FUN!


Wednesday, November 11, 2015

A TWOSOME OF BACKGROUND IDEAS

For your collage or mixed-media works, here's
an easy, quick dynamic duo.
 These ideas work well not only to serve as backgrounds but also as decorative papers to be torn or cut and added as needed.
First up is a method so simple it's almost embarrassing! Paper doilies or crocheted or lacy fabrics make great stencils for spray paint. And you can use the painted materials later!
collage, how-to
Remove some, add some, and spray again!
Wallpaper makes a wonderful start or mixed media material. Attach a sheet of it to a substrate if you wish to fill in a background fast. The floral below was embellished with painted flowers and stems. It's not a finished artwork in my view, but  I'm saving it for possible future use. I can picture torn pieces coming in handy, maybe.
Guhin, mixed-media
Ask your paint dealer for a discontinued wallpaper book or two!

Sunday, May 17, 2015

CREATE GORGEOUS PAPERS WITH THIS TECHNIQUE

I had some black tagboard and the urge to experiment!
Any black or dark surface will work with this method: how to make lovely metallic paper for collage or backgrounds or whatever you wish. (TIP: Tape the paper down!)
You'll also need interference paints (acrylics) and a crackle medium.
P.Guhin, how-to
I tried another crackle brand too, and it worked as well!


First, mix just one of your interference paints in a small container with water to thin it, and set aside. I did not do that with the gold paint, and it was too thick to work, as you will see later.
Next, apply crackle medium thickly to the black substrate, and work fast so it doesn't dry before the next step.
technique. art+blog, Guhin    
This is just the wet crackle medium on black.
Then quickly drip the thin interference paint into the wet surface. It will spread and maybe even separate a bit. 
how-to, tutorial, method, technique
The gold paint didn't work because it was too thick!

Thanks for following my blog!
 

Sunday, April 26, 2015

MORE TECHNIQUES WITH CITRASOLV

I tried more methods of creating visual texture with CitraSolv on magazine papers...these decorative papers can be used in collages, mixed-media paintings, and more. Previous posts with tips on using CitraSolv can be found here and here!
method, technique
With the one shown above, I covered the entire page (taken from Elle magazine) with a thin coat of CitraSolv concentrate, and used the large-size bubble wrap, pressing it well into the solution. Then I just let it sit overnight!
Here's one, below, made with bubble wrap with smaller bubbles, and a page from Lucky magazine.
art+activity, how-to
Is this one your favorite too?


Next, I used plastic wrap, pushing and shoving it
into big wrinkles on the solution. See below.
Guhin, tutorial, CitraSolv
This one was done with a page from Bazaar.

Finally, I had a bottle of the blue school glue (it's washable), and I used it as a mask or a resist, let it dry overnight, and then rubbed with a CitraSolv-soaked cloth to remove the ink that wasn't protected. See above.

There's a section with examples of CitraSolv papers in the book, Creating Decorative Paper.

Thanks for viewing this post! (Let me know
if you're inspired to try some of these ideas.)

Saturday, June 22, 2013

DECONSTRUCTING HANDMADE PAPERS TO MAKE A NEW ARTWORK

WHAT TO DO WHEN YOU DON'T LIKE A WORK ON PAPER!

I was experimenting one day with adhering layers of paper together and then tearing some of it off. I didn't care for one result, so I painted it mostly red with acrylics. When that was dry, I added white, black,  and blue paint, as shown below.
how to, how-to, tutorial
Not my best work, by a long shot!


I still didn't particularly like the result, but rather than add more paint, I cut it up into squares and rectangles of assorted sizes. Then I collaged them all together, and got the artwork below. 
low-cost art, frugal art
Which one do you like best?


Thursday, April 18, 2013

PLAYING WITH PAPERS AND PICTURES - Altered Art Mixed Media Techniques

Let's Color, Kids!
Altering papers and printed images to use in collage is easy: Stain, paint, tear, stitch, dye, burn, bleach, or scratch them for effect. Of course you can create dimensional paper, too, by folding, pleating, crumpling, and more.

paper techniques
Rolled, crumpled, creased, pleated, scored.


altering paper, art techniques
Strong coffee, wet tea leaves, walnut crystals, alcohol ink.


Tip:   I saturate papers with rubbing alcohol before applying alcohol inks. Then I immediately soften and spread the ink with a brush or piece of felt dipped in rubbing alcohol.

collage papers
The finished papers after colorizing them.
Alter lab-processed photographs with laundry bleach. This is not an archival technique, but it's fun! Try a gel bleach pen or a cotton swab dipped in liquid bleach. Apply it selectively to lift areas of color. When you've achieved the desired effect, rinse the print under lukewarm tap water and blot dry with a lint-free cloth. (Note that some papers and pigments resist bleaching action. Also, take all the necessary health precautions when working with bleach.)
 
bleaching and scratching
Bleached spots at left, scratched selectively at right.


Abrading a surface lends an aged, distressed appearance. To scratch the emulsion of a commercially-processed photograph, soften it in a tray of warm water for a minute. Blot it on a hard, flat surface and scrape away with a large needle, nail, or other scratch tool. Sandpaper removes large areas quickly. The light-colored marks show up best in dark areas of the photo.

And finally, do try this: Décollage is an art term that refers to a cutting and tearing technique based on the appearance of layered posters on billboards. The result leaves shredded papers, revealing portions of the images and text underneath.

mixed media collage
Decollage example


art blog, Paula Guhin

Friday, March 8, 2013

ALTER METAL-LEAF WITH THIS TECHNIQUE


"LEAF" IT TO METALLIC FOIL!  
Want to "foil around" and create an effect to use with paintings, collages, and more?

I used a rub-on sheet of gold leaf, shown below, and patina solution.
metallic foil, antique effect
Gold leaf as rub-on sheets.
tute, how-to, how to
Other patina solutions are available, too!
Caution: the antiquing solution eats through aluminum foil, so use plastic, waxed paper, shelf paper, or layers of old newspapers on your working surface!

In my experiment, I applied the copper metallic surfacer paint to the right side of my gold leaf paper, and the patina green solution directly to the left half.
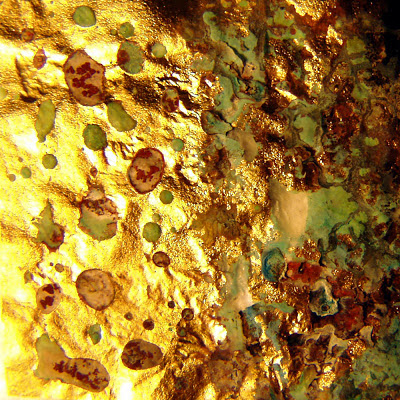
mixed media, art paper, technique
I prefer the right side, using both the coppery surfacer and the patina product.
 When the coppery paint was still tacky, not dry, I applied the patina solution to that side as well. Both sides were left overnight to dry.

Above is the result. Since it would flake off and perhaps tarnish, I sealed the surface with a spray varnish.


mixed media art blog

blogspot art blog


Saturday, February 2, 2013

EASY MARBLING TECHNIQUE WITH SHAVING CREAM

CALL IT WHAT YOU MAY, TO MARBLEIZE OR TO CREATE A MARBLING EFFECT IS EASY!
This is a simple, lovely way to make your own decorative paper.

Supplies and Materials:
  • Large shallow pan (but I used a sheet of aluminum foil!)
  • Cheap shaving cream
  • A spatula and/or a knife
  • Alcohol inks (or experiment with fluid acrylics or other inks!)
  • White or light-colored papers
How To:
    shaving cream, marbling, how to marble
  • Spread a layer of shaving cream about the size of your paper.

  • Dot the ink or inks of your choice on top. Here I used alcohol inks, below.
shaving cream method

  • Cut the knife through the shaving cream and the dots, dragging them into a swirling pattern.
shaving cream, marbling effect
By using the spatula FLAT, I rather messed up!


  • Lay clean paper over the design and press down for good contact. Let sit for a moment. Then peel the paper off from one edge to the other. 

tute, tutorial, easy lesson
Alcohol inks may provide less graphic results.

marble, shaving cream method


  • You will need to scrape off the excess shaving cream. SAVE the excess with the remainder of your used shaving cream, and you can do it all over again with more ink dots and another sheet of paper!
art lesson, easy, simple, marbleize

art blog, mixed media blog, Paula Guhin


Saturday, December 22, 2012

HOW TO USE THE RINSE AID TECHNIQUE


CREATE A COOL EFFECT WITH AN EVERYDAY DISHWASHER PRODUCT!

MATERIALS AND TOOLS:
  • acrylic (or watercolor) paint
  • water
  • paintbrush
  • canvas or paper
  • dishwasher rinse aid
  • rags
  • gel medium (optional)
  • squirt bottle (optional)
This lesson will show you an easy how-to, and you can use the effect you get as a cool background! 
Or you can do it on paper and use the dry paper later in a collage project.
  1. Cover the canvas or paper with acrylic paint in the color of your choice, to seal the surface. (You can also seal the surface with gel medium.) Let dry. 
  2. Select a contrasting paint color (much lighter or darker than the first) and thin the acrylic paint with water. 
  3. Apply the thinned paint quickly, and while it is still wet, drip the rinse aid into it.
instruction, advice, tips
Beginning the rinse aid technique

Note: You can use a thin brush to draw rinse aid lines, or make large spots of the rinse aid run by tilting the paper or canvas. You can even saturate a sponge with rinse aid and stamp it onto the wet paint.


The effects you get might be satisfying this way (especially with watercolors!), but here's another tip: Use a damp rag or paper towel to wipe off the surface.


technique, tute
Example of  the technique using acrylic paint on mixed media paper

More advice? If you aren't happy with your results, repeat the process with a third color of acrylic paint!

Experiment with different color combos on a variety of surfaces. 


The example below was done with watercolors.

tutorial
Spray the paper with water first for best results.

Sunday, May 27, 2012

A New Assemblage & A Contest Winner Announced!

My thanks to those who entered the recent art book giveaway. I appreciate it and encourage them to try again to win a future freebie. The winner, whose name was drawn fairly and randomly, is Elayne Koenigsberg!  I have shipped the book, Creating Decorative Paper, to  Elayne.  

MIXED MEDIA ASSEMBLAGE FOR SHOE-LOVERS
I used a thrift shop shoe, a doll's porcelain head, and lots of costume jewelry for this piece. 
There's even a little angel figure in there.  It's a great way to reuse junk and exercise your creativity.


assemblage, mixed media, shoe art
A Shrine That's a Shoe-In!

Monday, April 16, 2012

HOW TO IMPRINT LEAVES WITH DYE & MAKE SOMETHING BEAUTIFUL!

This project is so easy, and yet the results can be very striking! 
Use the papers as artworks in themselves, or as backgrounds or collage elements in other works.


MATERIALS:

  1. Absorbent, smooth watercolor paper
  2. Liquid fabric dyes
  3. Leaves with prominent veins
  4. Pane of glass or plexi, and heavy books
PROCESS:

  1. Arrange a variety of leaves (different sizes and shapes) on a pre-dampened sheet of watercolor paper. Add a few grasses here and there if you like.
  2. Flood the paper with vivid, beautiful colors of liquid fabric dye. (Liquid watercolor paints or inks work, too.) Select a few colors, lighter and darker, that work well together.
  3. Place the sheet of glass on top, and a heavy book to weigh it down. Let dry overnight. Try several of these, since results can be mixed.
[cool colors]


Be sure to check out my previous post on how to select a fabulous colour scheme! And please see my photo blog on Tumblr, I Luv Photography!

Friday, February 10, 2012

How to Create a Mock Leather Effect

My most recent book at the time of this posting is Creating Decorative Papers (available from Stackpole Books or Amazon.com, amongst others). There are two different methods in the book regarding faux leather. One of them is pictured here, and it's really easy!


You can use this 
distressed leather effect 
on a book cover,
 in a collage or collage/painting, 
even on your walls or wood furniture!