Showing posts with label photography. Show all posts

Tuesday, January 24, 2017

BOOK ART: Anyone Can Do It!

I'm not one to fold book pages into fabulous, complicated designs, but I admire those who do.

Guhin, mixed-media This is a terrific way to create beauty from unloved, unwanted books.

I'm the free-form type, decidedly not methodical, so the project detailed below was just my style.

I filled a large pan with a little acrylic medium and a lot of water.  White glue would be a good substitute for the medium. I also collected thin pencils, thicker ones, and fat rolls of waxed paper. These would serve as armatures. Remove hard covers from the book unless you want a straight "stem."
mixed-media, art+blog
Oh, but wait, there's more!
Dipping pages--still attached--into the pan (sometimes just one or two, sometimes more!), I wetted them, removed from pan, and rolled. I varied the directions and amount of curve, as you can see in the photo above. And yes, this takes awhile, since I only recommend doing a few sections at a time. I left the supports inside until dry, but the diluted mixture dries fast. 
art+blog, mixed-media
Took a couple of days, but so fun and simple to do!

I used spray paint and a touch of brushed-on acrylic paint on  mine. Then I photographed it from above. I suggest either white, gray, or black as a background.

Here's another idea to try, if you're more precise and meticulous than I: a butterfly!

                (Art teachers might find discarded books and try this with fast-working kids who always seem to need more to do. If not photographed with a digital camera, try scanning.)

Friday, November 25, 2016

ALTERING PHOTOS FOR FUN!

photo, how-to, mixed-media-manic
Scratched first, then the color was enhanced with markers.
Got any old processed prints that just aren't the best? Did'ja go through old albums with relatives at Thanksgiving (or maybe you WILL, at Christmas), and found or will find some duplicates or just plain bad shots? Here's some ways to have PHUN WITH PHOTOS! Even with kids (see my caveat below)! One or two can even be done with inkjet prints, while a couple of others require commercially-processed pics.

First, for the scratching activity (the photo above with the leaded glass), dip a processed print in lukewarm water about a minute, blot, and use scratch tools or even sandpaper on the parts you wish to lighten or remove. If the emulsion hardens too quickly, just run warm water over the picture again.
If you want, add color back in with markers, watercolors, or inks. This project is a great way to re-work photos that contain distracting elements! Here's a link to another scratched example.

Next, bleaching the print is best done on a commercially-printed photo, since rinsing afterward is a good idea. Inkjet prints would run with a water rinse.) Try a bleach pen if you want to write words or numbers or symbols. Then wipe with a damp paper towel, rinse under water, and dry. Young children should not attempt this project.
tute, how-to, mixedmediamanic
Shot inside an old house to "frame."
In the photo above, there was just too much dark and my view wasn't great anyway.
BUT, here's another way to use household laundry bleach with photos! Mix a solution with half water, half Hilex in a tray. Dip part of the photo in and watch the colors change! You can even protect parts of the photo with a wax resist product first if desired, and then dip the entire thing into the tray of bleach solution. See example below. Also see "Dodg" at this link.

tutorial, photos, Guhin
Partially bleached in a tray.
Cutting and rearranging the parts is nothing new, but it IS easy and sometimes the results are striking. I've also previously discussed stretching two similar pictures into one, discarding the most boring strips. (See another example here.)

how-to, photo, art
Of COURSE it works with either
horizontal or vertical strips, even
angled pieces!
Finally, coloring photos the easy way, with markers: Try buffing or smoothing out the streaks with cotton balls. Go for unreal colors and psychedelic effects.
tute, photography, how-to
Markers are just so easy!
Thanks for viewing this post! I appreciate it.


Saturday, May 21, 2016

PHOTO ARTISTRY: NOT JUST FOR PHOTOGRAPHERS!

As some of you may know, I'm keen on photography,
and also big on using up all my old photo prints that
are less than perfect.
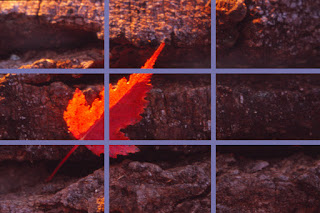
In fact, my book Adventures in Photo Artistry is almost all about creating artworks from them. Artists can also find numerous tips on composition, such as the rule of thirds illustrated below.
composition
I've created many, many collage projects and montages too, plus numerous transparency activities. The piece shown below is one of the latter, with selective removal of a portion of the image done by hand.
scribble, art+blog
 
Guhin, blog
 Similarly, this transparency (above) has been drawn on with markers. If you do this, choose an image with white (meaning clear) areas so your marks will show up well.

Here's another post, dibble-dabble-scribble, using transparencies, again with some selective removal of the image.
And yet another! mixed-media-with-transparencies 

Saturday, June 6, 2015

NOT MIXED MEDIA WITH TRANSPARENCIES AGAIN!?!

(My apologies in advance for those of you who prefer your mixed media without the addition of transparencies.)
I find copies so versatile and fun that I've experimented endlessly with them in many guises. I've also posted about them in this space numerous times, so please bear with me if you've been a long-time follower.
NOW FOR TODAY'S PROJECTS!
technique, art+activity
I printed this out on my home computer.
I used an original
leaf photo of my own,
altering it in Photoshop
for a very colorful
background.
TIP: Note the
white spaces,
necessary for this
activity. Also remember
that your own
background cannot be
too terribly dark, or
you will lose contrast.

Next, I altered a
photo portrait to
pure black (and
clear), very
graphic (no gray).
I printed that 
transparency, P.Guhin, how-to
Try other backing sheets too! Sooo fun.
onto transparency
film, and lay it
over the colorful
background image.


Below, another idea!
I merely used soft
pastels to create a
gradient effect on good paper the same
size as my transparency (of a person on a dock, framed by foliage). Then I just sandwiched them together. So simple and yet, I think, quite striking.
tutorial, technique, Guhin  
Some of you might prefer more color in the sky.
PRIZE AWARDED TO A FOLLOWER! For those who participated in last week's contest,
the winner is Julie Mortillaro. Congrats to her, and
my sincere thanks to the others. Julie, please
privately send me your usps mailing address.

Friday, March 20, 2015

SCRAPING & SCRIBBLING - Fun with Transparencies

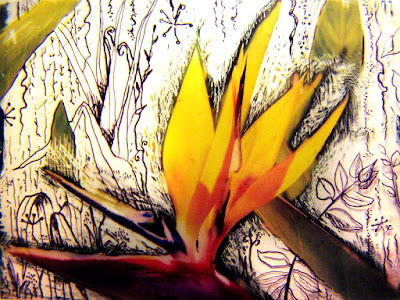
I've discussed "bad" photos in this space before. Here's a great way to rid yourself of distracting backgrounds and add some great doodling, which is always fun.

First, I printed out my own, original photograph (below) on transparency film.

Guhin, transparency
LOVE these flowers...Birds of Paradise!

Then I used a scratch tool to scrape away the background, working on the emulsion side.
Next, a fine permanent marker or two (in black), and I really enjoyed this part!
Tips for variations: Try colored markers if you wish, or metallic ones. And try both wide and thin tips!
I mounted mine over white paper, but you could use colored art paper instead...oooo!

photography, transparency, scratch
Note that I left selected elements of the original background, too.

Thanks for viewing this post!


Tuesday, December 16, 2014

AN EASY PROJECT (& more) FOR ANYONE!

HERE'S A QUICK, SIMPLE TECHNIQUE FOR MULTIPLE, DUPLICATE IMAGES OF DIFFERENT SIZES.

  • Print out the duplicates on a copier that creates different sizes , or use an image-editing program to make the sizes smaller or larger. 
  • ANOTHER IDEA: Make every other size lighter or darker, or positive vs. negative! You could even go color vs. grayscale for every other one!
  • Trim away the white edges of each image if desired, and arrange them on a sturdy background before you adhere them.
  • MORE IDEAS: Instead of symmetrical design and formal balance like my example below, try asymmetrical, informal balance in any number of ways. Here are a couple of former posts with more finished examples: digital collage! and another.
how-to, tutorial
Wire Chicken Basket with Eggs


Tuesday, December 9, 2014

USING A TRANSPARENCY AS SCRATCHBOARD

This project is not difficult at all, but the results are striking! 
  1. Print an inkjet photo that is high contrast, with many "white" and pure black areas. No gray to speak of! Print it onto an inkjet transparency.                                                                         
    transparency, Guhin
    A real scratchboard tool is great for this!
  2. Flip the transparency to the unshiny, printed side and improve the photo by scratching away some of the black areas. Great opportunity to add visual texture!                                                                                                                                                                        
    how-to, scratchboard, transparency
    Improving the inked side of the transparency.
  3. If some scratched areas need to be pure white for better contrast, rub a damp cloth over them to remove ink.                
    transparency, scratchboard, how-to
    Flipped over to the shiny, front side and ready for the next step!
  4. Next, let's add color to this thing. You COULD paint the back side with acrylics, as shown in this previous post. OR you can do it this way, with colored art paper!  Lay tracing paper over the front side of the transparency, and trace all the shapes that you wish to be colored.         
    Guhin, tutorial
    I'm tracing the mask shapes here, onto thin paper.


5. Use the tracing paper shapes in a sandwich to cut out colored art papers, and arrange the colorful shapes on a sturdy background the size of your transparency (or larger).          

collage, tutorial
I like warm and hot colors with black and white.
  
6. As you glue the colored paper to the background, keep checking  with your transparency that they are in position.  When they are dried in place, adhere the transparency (shiny side up of course) on top.  All done!
collage, tutorial, Guhin
Original photo and mixed media art copyright Paula Guhin


Monday, November 3, 2014

DO YOU DOODLE? DECORATIVELY FRAME A PHOTO!

How's this for a frame-up? Hand-draw your own
edge around a mounted photograph.
 
Even a snapshot glued to matboard will do. Let the subject matter be your guide as you embellish all around it. Use pencils, pens, or markers to make your border.
If it's a rustic country photo, try a rough wood-grain effect or draw some barbed wire! Is it a floral? Use colored ink or colored pencils and draw leaves, vines, buds...you get the idea.
Guhin,
Variation: Add texture by applying modeling paste or crackle paste around the edges of the photo! (Be sure to "antique" when dry, with thin dark acrylic paint.)
 
mixed-media, image+art

art, blog, how-to, tutuorial


Sunday, August 10, 2014

Alter a Photo for Collage (or just for fun!)

Scratch a Photographic Print  to Add Interest
 
I'll bet you have some commercially-processed photo prints that are less than perfect. Or maybe you have duplicates, or disappointing enlargements.
 
Here's how to have some fun with them...and if you goof up, it's no loss. If you like the effect, the "new" piece might stand alone--or you could work it into a painting or mixed media artwork.
 
First, soak the print in warm water (not too cool, please) to soften the emulsion. Gently blot dry.
 
Then just scratch away with a good, sharp tool! The technique works best in the dark areas of the photograph. The lines may be yellow or blue, depending on the print.
 
technique, tutorial
If you don't like it, cut or tear into collage pieces. 
NOTE: I plan a giveaway soon with a very useful prize! It will be just for my followers.


Wednesday, March 26, 2014

PhotoMontage Rainbow!

So colorful! So graphic! So easy that kids can do it!

photography
High-key photograph, black and white.


First, you need a high-contrast black and white photo image.
 
      Load a photocopier with three or four colors of copier paper. Lighter colors work better, but brights are outstanding! 
    tutorial, art book, art lesson
    My beloved Arab stallion, missed greatly.
    • Sandwich the copies together and cut strips either vertically or horizontally (but not both). TIP: Vary the widths of the strips for added interest.  
    • Another TIP: Lay the pieces down in the correct order!
    • Alternate colors as you glue the strips  to a sturdy substrate. (Yes, you'll have enough leftover strips to do this project two or three more times!)      
    art book, P.Guhin
    Do the strips detract from the photo? Maybe, but it's fun!
    Find many more exciting photo-art activities in this new book, pictured below!
    
    Paula Guhin
    Available Here!
    Paula Guhin


    Monday, February 10, 2014

    Digital Collage or Hard Copies in Successive Sizes


    What Lies Beneath 
    Take your photographs to a completely new level—several, in fact. Build a layer cake, of sorts, with…um, layers! Besides working with digital images, you can even do this project with successively sized photocopies or enlargements of the same image, creating a collage.

    technique, how-to
    Photo copyright P. Guhin 

    To Begin
    It’s important to select a borderless photograph with graphic impact. Close-ups work well, as do longer shots with simple, empty backgrounds. A cluttered-up photo is too “busy” for this activity.
    Lay It On
    On a background of your choice (even a full page-spread of the featured photo itself), paste a copy of the image, scaled a bit smaller. Lose the rectangular format if you wish—the image can be square, oval, circular, even free-form! Adjust the brightness or tone of this second layer as needed, for better demarcation from the background.
     Center this photo or use informal balance. And now a word about that!
    Balance
    Combine the elements of a layout in a way that adds a sense of stability. Equilibrium can be achieved with symmetry or asymmetry.
     Symmetrical balance refers to a formal design in which the two halves of the piece mirror each other.
     An asymmetrical arrangement is informal and takes into account the visual weight of each part. For example, a large, pale shape on one side can be balanced with two small, dark shapes on the other side. Darker values appear “heavier.” The same holds true of bright, intense color—a spot of it goes a long way!
    Build It Up
    Repeat the process of pasting in another layer of the same image, scaled smaller than the previous one. If you wish to create an asymmetrical design, move this copy up, down, or to one side.
    If you’re offsetting consecutively smaller images, you can either rotate each slightly or maintain a level appearance, whichever you prefer.

    P.Guhin, photography, collage
    Variety and Contrast
    Be sure all your layers show up well. Desaturate every other layer (if the original image is in color), or adjust color balance differently in each layer. One cool option is to work from lighter to darker layers or the opposite. The possibilities are endless!
     If you’re using photocopies or printouts, set the copier or printer progressively lighter if desired, or use a different color of paper for each print.

    Finally, if you wish, add text and any other embellishments in such a way that they do not interfere with the visual impact of your striking design.
     Do try this project—instead of a level playing field, play on a field of levels.

    P.Guhin
    Paula Guhin

    Tuesday, April 12, 2011

    Collage/Painting

    This photomontage was hand colored with watercolors and markers in some places on the black and white photos. Then I glued down the photos, an index print, and a few paint color samples, and finally added acrylic paints to help unify the composition.


    Saturday, January 29, 2011

    BLOG CANDY WINNER ANNOUNCED! The follower who won the freebie is...

    DONNA! I will be contacting Donna via email and shipping the contest prize as soon as I have her mailing address. A huge thank you goes out to everyone who left comments. Follow this blog for another contest soon, and watch for fresh tutorials, too!

                             Below is an original photograph of mine that I found quite apropos for the upcoming holiday.

    Sunday, December 19, 2010

    Contest...Freebie! Blog Candy for my Blog Followers!

    This is my way of saying thanks to the kind people who follow my blog, and to encourage new ones, of course. Nothing for you to do except BE a follower! I will put all the screen names into an impartial drawing (my husband won't look, I promise) on the evening of December 26, and announce the winner here. Of course I will need the winner to email me his or her USPS (snail mail) address, to send out the prize, a framed artwork, shown below. This piece also appears on page 133 of the book, Image Art Workshop.
    I will ship the artwork internationally if the winner is not from the U. S. 

    Sunday, June 13, 2010

    A Flashlight Foto...Try It Yourself!

    Not exactly mixed media, this, but I DO use all my bad photos (the ones that don't turn out as well) as the substrate for paintings. I use clear gesso on the enlargements, and acrylics when the gesso is dry. It's sort of like paint-by-numbers, cheating but not really, since I took the photos.


    NOW, here's how to paint with light!


    You need a camera on a tripod, a cable release, a very dark room, and flashlight(s) with or without colored cellophane or a filter over the flashlight lens. You can use a colored filter over the camera lens too, if you like, but let's keep this simple, ok?


    Arrange your subjects and frame them in the viewfinder with the room lights on. Then turn off the lights, begin the exposure,  and play the flashlight over the subject, moving it constantly to prevent hot spots. It's trial and error, so try one exposure at 15-20 seconds, another at 30-45 seconds, and another at one minute, perhaps. I usually set my f-stop at f-16 or so.
    Any questions? Email me! And please become a follower and/or a friend...I need all the help I can get!