Showing posts with label art activity. Show all posts

Saturday, October 12, 2019

A MONOCHROMATIC EXERCISE FOR ART TEACHERS & OTHERS

SQUEEZE-BOTTLE LINES WITH BLACK GESSO
 
Gesso has enough body and tooth to use as a barrier to hold in wet media, once it's dry. 
gesso, painting
I made my own black and gray gessos.
You can buy colored gesso or add acrylic color to white gesso. A clean squeeze bottle served me well for "drawing" the shapes. I also filled in some areas. Then I let the design dry overnight, before painting. See the first step above.
 
Then, the next day, I used diluted paint to complete the forms and shade parts of the background. 
painting, Guhin
This study was finished with fluid black acrylic and water.

The water and paint stayed within the confines of the slightly raised gesso lines. This exercise might be good for middle schoolers or beginners at the high school level. Art teachers could substitute watercolors at the painting stage if desired. Even pastels would be great! Students could create their own designs rather than relying on this "Pebble" motif, of course.
Guhin

Sunday, February 5, 2017

BACK TO THE DRAWING BOARD: BASIC FORM

Many Art I students or absolute beginners at the high school level require a great deal of practice when learning how to shade forms. That said, I’ve assigned to eighth graders the two exercises described here. And nearly every one of them enjoyed triumph with both! Performing the tasks required of them, my students, um, drew on their knowledge of essential art concepts.
It was fun to go loopy and bundle up, too!   
how-to, art+element
This might be too challenging for fifth or sixth graders.
GETTING STARTED   Before class, I had cut white drawing paper into 4.5” x 12” strips, one for everybody. Using transparent tape, I affixed one end of a paper strip to a drawing board to show the students how to start. Then I twisted or curved the strip toward the center and fastened that portion down, too. A final bump or curl, taped down at the paper’s end, makes the form even more interesting. I asked the class to create their own unique, "unboring" forms directly on their desks, but to leave work space on their desks for themselves!  

Before my demonstration on the board, we held a discussion on the element of form, with emphasis on its three-dimensionality and the use of light and dark to depict that. Then I drew an enlarged sketch (outlines only) of my bendy, taped-down example for everyone to see.

I passed around several finished works to exemplify our objective. My own shading on a whiteboard didn’t have the quality I wanted, so I used a piece of 18” x 24” white drawing paper and charcoal instead. Nattering away about values, gradations, and hills and valleys, I smeared charcoal from dark to light to transform my outline drawing into a form with mass. Then the kids began their own works with soft pencils, and I was able to walk the aisles to assist. I directed the artists to include the cast shadow on their desks, to ground their subject.
Guhin, art+blog
A form that takes up space!
I reminded the students to try to use their blackest blacks and their lightest grays—a full range of values. The class members were reminded of several fundamentals with the “wavy strip” lesson. ART TIP: Imaginative kids might poke a hole in their paper forms. I had one who even left a pencil in!

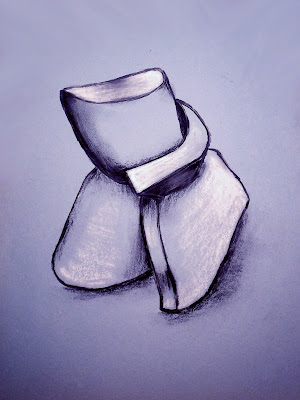
A BUNDLE OF FUN The second, related activity is best for another day, especially if class time is only 40 minutes or so. I had been given scraps of flexible foam rubber padding, so I shared a piece with each student. I instructed them to squeeze and squash their foam any way they wanted, and then tie a piece of string tightly around the bunched-up form.
tute, how-to, draw, form
Charcoal and white chalk on blue paper.
They could roll it, pinch it, and fold it any which way before tying it into an interesting form, but they should keep in mind that they would be drawing the bundle! If it was terribly complex, they could be quite challenged.

WE BEGAN very lightly with charcoal pencils on light blue construction paper.  But you could use any toned paper (not too dark), even brown wrapping paper! Following the contours of their bundles with their eyes, class members completed line drawings first.

Then we modeled the sketches with shading, just as we had done in pencil shading the drawings of the wavy paper strips. Again, including in their drawing the shadow cast on their desks was part of my message. “It helps to anchor the drawn form to the page.”
Guhin, MixedMediaManic
Ask a carpet-layer or re-upholsterer for foam scraps!
Lastly, here’s the reason for the toned paper: We added highlights anywhere the light would strike, especially the rounded tops of bulges. That finishing touch helped to illustrate the volume of the forms very well.
MATERIALS
  • White and toned drawing paper
  • Soft drawing pencils
  • Transparent tape
  •  Charcoal pencils
  • Upholstery foam scraps or carpet foam padding
  • String or rubber bands
  • White chalk or white pastels
LEARNING OBJECTIVES: to earn the importance of drawing what they see by using the elements of form and value, & to create a realistic work of art presenting the illusion of mass.

Tuesday, January 24, 2017

BOOK ART: Anyone Can Do It!

I'm not one to fold book pages into fabulous, complicated designs, but I admire those who do.

Guhin, mixed-media This is a terrific way to create beauty from unloved, unwanted books.

I'm the free-form type, decidedly not methodical, so the project detailed below was just my style.

I filled a large pan with a little acrylic medium and a lot of water.  White glue would be a good substitute for the medium. I also collected thin pencils, thicker ones, and fat rolls of waxed paper. These would serve as armatures. Remove hard covers from the book unless you want a straight "stem."
mixed-media, art+blog
Oh, but wait, there's more!
Dipping pages--still attached--into the pan (sometimes just one or two, sometimes more!), I wetted them, removed from pan, and rolled. I varied the directions and amount of curve, as you can see in the photo above. And yes, this takes awhile, since I only recommend doing a few sections at a time. I left the supports inside until dry, but the diluted mixture dries fast. 
art+blog, mixed-media
Took a couple of days, but so fun and simple to do!

I used spray paint and a touch of brushed-on acrylic paint on  mine. Then I photographed it from above. I suggest either white, gray, or black as a background.

Here's another idea to try, if you're more precise and meticulous than I: a butterfly!

                (Art teachers might find discarded books and try this with fast-working kids who always seem to need more to do. If not photographed with a digital camera, try scanning.)

Sunday, December 25, 2016

MONTAGE & SCRAP PHOTOS & MORE

Duplicate prints and downright bad shots
 can be put to good use...I've said it before.
SURE, PHOTOSHOP CAN ACCOMPLISH ALL THESE
TECHNIQUES, BUT THE OLD-FASHIONED
WAY IS AWFULLY FUN.
In this first example, a large print served as the support (or background, if you will). Then I found other, smaller prints to cut up and arrange to make the work more interesting. Do try this, but only glue the pieces down when you're happy with the composition. I like the complementary colors together.

collage, montage
Good method for hiding the worst parts!
This next idea is the "more" mentioned in this post's title. My so-called example below is a straight photograph, with no manipulation or mixed-media. But it gave me an idea! Make your own "trellis" with thin chart tape, fine-line tape, or other colored tape! So easy, and yet you can be as creative as you wish.
how-to, tutorial
Copyright Paula Guhin
Our third photograph has been manipulated a great deal!
It's a weaving, of course, with yarns, wallpaper strips, and more.
I worked around the figure...she's not simply pasted on top!

 
I've featured other fun photo projects on this blog. Check out this photocopy fun page and this painted collage post. Also another painted collage page here. AND 3 photomontages, fun and cool.
Happy New Year, everyone!

Friday, November 25, 2016

ALTERING PHOTOS FOR FUN!

photo, how-to, mixed-media-manic
Scratched first, then the color was enhanced with markers.
Got any old processed prints that just aren't the best? Did'ja go through old albums with relatives at Thanksgiving (or maybe you WILL, at Christmas), and found or will find some duplicates or just plain bad shots? Here's some ways to have PHUN WITH PHOTOS! Even with kids (see my caveat below)! One or two can even be done with inkjet prints, while a couple of others require commercially-processed pics.

First, for the scratching activity (the photo above with the leaded glass), dip a processed print in lukewarm water about a minute, blot, and use scratch tools or even sandpaper on the parts you wish to lighten or remove. If the emulsion hardens too quickly, just run warm water over the picture again.
If you want, add color back in with markers, watercolors, or inks. This project is a great way to re-work photos that contain distracting elements! Here's a link to another scratched example.

Next, bleaching the print is best done on a commercially-printed photo, since rinsing afterward is a good idea. Inkjet prints would run with a water rinse.) Try a bleach pen if you want to write words or numbers or symbols. Then wipe with a damp paper towel, rinse under water, and dry. Young children should not attempt this project.
tute, how-to, mixedmediamanic
Shot inside an old house to "frame."
In the photo above, there was just too much dark and my view wasn't great anyway.
BUT, here's another way to use household laundry bleach with photos! Mix a solution with half water, half Hilex in a tray. Dip part of the photo in and watch the colors change! You can even protect parts of the photo with a wax resist product first if desired, and then dip the entire thing into the tray of bleach solution. See example below. Also see "Dodg" at this link.

tutorial, photos, Guhin
Partially bleached in a tray.
Cutting and rearranging the parts is nothing new, but it IS easy and sometimes the results are striking. I've also previously discussed stretching two similar pictures into one, discarding the most boring strips. (See another example here.)

how-to, photo, art
Of COURSE it works with either
horizontal or vertical strips, even
angled pieces!
Finally, coloring photos the easy way, with markers: Try buffing or smoothing out the streaks with cotton balls. Go for unreal colors and psychedelic effects.
tute, photography, how-to
Markers are just so easy!
Thanks for viewing this post! I appreciate it.


Wednesday, October 19, 2016

MASKED MONOPRINTS & WAXY TRANSFERS

TWO BRIGHT IDEAS TO TRY! 
MASKING with flat paper cut-outs enhances this
first technique, monoprinting. I usually roll
water-based printing ink onto a sheet of
Plexiglas and draw or scrape designs directly
on that surface. I used rubber tips and many
other scraping tools to make lines, shapes,
and patterns.

TIP: Work quickly so the ink doesn't get too
dry.

 Then add the paper masking shapes, which                            
you could prepare ahead of time if you know
what your theme or motif is.
 
Lay the paper shapes on top of the still-wet
ink, wherever more white is to be preserved.
Place the sheet of printing paper onto the
inked, designed surface. Press all over the
back with the flat of your hand. Peel the
Guhin, copyrighted, blog
I used oil pastels on this monoprint.
print off, let dry.
While the black-and-white
prints have graphic appeal,
they’re even more delightful
when partly colored. Use
dry media when the print is
thoroughly dry: colored
pencils or pastels (oil or chalk).
However, if you printed with oil-based ink or acrylics,
the print is not water-soluble and you can colorize
with inks or watercolors!

Guhin, art, blog, tute
This page spread appears in the November issue of Arts & Activities
Magazine, which any visual arts educator should have!

IMAGE TRANSFER with waxed paper is exciting. 
Computer images that are graphic and black &            
white work best on the waxed paper.                                 
 
The final print will be reversed.

First, the computer image must be no larger
than 8.5” x 11.”  Cut both smooth watercolor
paper and waxed paper to that size, too.
Then dampen the watercolor paper with
water and wipe it off, because too much
water will make the print blur terribly.
Set that aside but don't let dry too much.
 
To prevent wrinkles or jamming the printer,
scotch tape the waxed paper smoothly to a                                                
sheet of printer paper at the top. 
how-to, tute, tutorial
Image transfer on waxed paper.
Or use repositional adhesive spray at the top end.
Either side of the waxed paper works.

Feed the sandwich into the printer and print.
 
TIP: Definitely use an inkjet printer.

Don’t be alarmed by the “faint” print you get
on the waxed paper…it’s supposed to look like
that! Gently lay it ink-side down onto the pre-
dampened watercolor paper. Holding the
waxed paper firmly down so it doesn’t move,
press all over with your hand. Then carefully
Guhin, art+blog
Watercolors on sealed print.
lift the waxed paper. It will still have ink,
so be careful not to drag it.

These prints are water soluble,
so colorize with dry media only.
Or spray the print with
clear acrylic when dry,
let that dry too,
then add watercolors or inks.
 
Both techniques are easy and fun to do,
so I hope you enjoy them.


Saturday, September 3, 2016

NOT ONE BUT, COUNT 'EM, TWO TECHNIQUES!

METHOD ONE: CREATE INTEREST WITH INDIA INK...
A SHARP IDEA!
Besides the permanent ink in a shallow dish, you'll need a single-edged razor blade.
how-to, tutorial
This is the ink I used, and it worked fine.
My first example, below,
was done on watercolor
paper, but do try Yupo or
even a canvas!
Dip the sharp edge of the
blade into the ink, and use
it as a drawing tool
on wet or dry paper.


art, blog
I've done both here.

 METHOD TWO: GESSO HAS PULL!
In this demo, you'll pull a wide brush of white gesso through wet color and ink lines. But you must be quick and work while it's still wet! I used a primed canvas as my substrate. Do limit your paint palette to three or four colors that work together. You'll also need a spray bottle of water, a rag, and the goodies we used above in method one.
FIRST: Paint swatches of your colors all across the surface, leaving some bare white above and below.   

art, blot, acrylics
Colors included several metallics and Quin Nickel Azo Gold.


SECOND: I used the trick from method one, both horizontally and vertically, before the paint could dry.

Guhin
Is your wide brush filled with gesso for the next step?
Note that I extended my black lines to the bottom but not at the top of my painting.
THIRD: Pull the brush and gesso down through some of the paint and ink at the left of the page, and continue across in the same manner. Beware of muddiness...you might wish to clean the gesso brush once or twice. Don't do anything at the top of the artwork just yet!
painting, art+blog, mixed-media
Still not finished, but cool beans, huh?
FOURTH: Spray clear water on the top portion and tilt the paper, encouraging it to run a bit. If the paint and ink is now too dry to flow, add a little more as needed. I also tipped my canvas for some flow toward the bottom!
Blot anywhere it's needed, or blend with a clean brush, or add more lines, or dots of color, spattering, even a few scribbles! (I had a great time with mine, below.)

technique, tutorial
I even used gesso to make more razor blade lines.

Thanks for viewing this post! Do come by again.


Saturday, August 27, 2016

BRUSHO REALLY BRINGS IT!

I've been a big fan of Brusho Colours (can you tell they're from Great Britain?) for a long time. They're watercolor ink powders or crystals, and very versatile!
For the painting today, I used heavy-weight white Yupo. Yupo is good for mixed media, pen and ink, acrylics, even pencil! Today's example was first done with alcohol inks, which Yupo seems MADE for!  

how-to, art+blog
STEP 1: Leave some lighter areas too!

Alcohol inks dilute with, um, alcohol! And on Yupo you can blot them with a rag or blend in other alcohol ink colors while they're still wet. But on absorbent paper you can't do that as easily, and they do dry quickly.

 
STEP 2: Acrylic gloss medium (or satin, even matte medium!) is either brushed on in places or squeezed from a plastic bottle. ART TIP: Work quickly so the medium does not dry.
 
STEP 3: While the clearish acrylic medium is still wet, sprinkle Brusho crystals over it in colors that work with your scheme. ARTIST'S TIP: These powerful powders will leave a stain on wet fingers, for awhile at least!
art, blog, how-to
You can even add water wherever the powder needs blending.
This is such a super-fun technique! Easy, and great results for all ages!


Monday, August 22, 2016

TRYING OUT SOME PAINT AND A NEW ART TOOL!

Painting loosely, freely, is a tool for beginners as well as advanced painters. Play! The goal is not necessarily to make paintings for exhibition. Rather, the goal is to allow yourself to loosen up, find your true creative self.

I bought three small squeeze bottles of acrylic paint. High flow is fun! Quin nickel azo gold, permanent violet dark, and green gold.

how-to, art+media
Love these colors!
I also purchased Fineline
bottles with two sizes of
tips. For today's post, I
used the finer line, not
the standard.
art+blog, how-to
These are cool!
FIRST
Before using either, I drizzled colored tar gel on watercolor paper. In a small container, I mixed clear tar gel with acrylic paint. (Wish I'd used a bit more tar gel, so the scribble would be more transparent! I meant to merely tint the tar gel.) The end result of this first step looks messy, but was fun to do.

mixed-media, art, blog
Wish I'd used less paint...this got too opaque.

SECOND
After that was dry,
I painted with the 3
acrylics, wet on wet,
leaving some white.
I actually worked
directly from the
bottles, but spread
the paint with a wet
brush too. Wheee!
(High Flow Acrylics have an ink-like consistency that lends itself to a wide range of techniques: hand-lettering, spraying, and much more. Use them with an airbrush, a dip pen, a refillable marker, etc.  I have the 1-oz. bottles that I can fit with a fineline head.)

blog, mixed-media
Not done yet. Looks sorta "intuitive," doesn't it?!
FINISHING
When that was dry, I used the fineline to accent some areas still further.
Guhin, tutorials
Fineline applicators allow you to create complex designs and draw lots of cool lines. They make precise, accurate, controlled placements of liquid media possible.
Use them with acrylics, inks, gutta, watercolors, silk dyes, stains, water-based adhesives, glazes, and other liquid media. They have a cap and wire system that resists clogging. Buy them (empty) for about $9.00 for two of the same size. You can get replacement tips, too, which tells me maybe people DO clog them!
 
If you're inspired and can afford them, give these products a try. They're a blast!
(Attention Golden and FineLine, I'd love a few freebies if you read this!)


Friday, July 29, 2016

MASK UP WITH MARVELOUS MASKING FLUID

Resist fluid is a favorite of mine that works
well with fluid acrylics.
Here's a finished example, below, and I'll provide the steps (and some pointers) below that!
art+blog, acrylics, how-to
After the latex was removed, I painted parts of a few exposed lines.
Resist fluid makes an exciting addition to any painter’s resources.
painting

I didn’t have a Fineline Resist Pen at the time, so I applied lines and dots with a painting knife. Always apply this product to dry paper! The latex rubbed right off my knife when I was finished.

Other application tools you might use include wooden skewers, toothpicks, old (bad) brushes, even dip pens. Most resist fluid doesn’t thin with water, but you could try ammonia.

If you make a mistake, just let the masked line dry and remove from the paper.

ART TIPS: Don’t try drying the masking fluid design with a hot hair dryer! (But don’t leave the fluid on absorbent paper for a very long time. Also, masking fluid becomes gummy if you leave the cap off too long.
painting, how-to, mask, resist
Let the fluid dry before you go to the next step!
When my mask was dry, I painted with watercolors, although fluid acrylics are fine. (Granulating medium made the gray areas more interesting.)
You MUST let your painting dry well before removing the masking fluid! The latex can be removed with a rubber cement pick-up tool, but I just rub a finger over the masked lines and shapes.
I wanted to color some of the white lines,
so I used blue at right and left edges.
But do leave some white, darn it!
The original white paper will
make your painting sparkle.
 
 THANKS FOR VIEWING THIS POST!