Showing posts with label papers. Show all posts

Saturday, October 12, 2019

I'm Back & Painting, Playing with Mixed Media, Creating Assemblages & More!

 Holbein inks and Sennelier shellac-based inks are fun to work with. I wanted to create some cool collage papers with them.
 
The 13 Holbein drawing inks are waterproof and come with droppers in the screw-on tops. Some are transparent, some opaque.
Sennelier shellac-based inks have a transparent, satin finish and thin with water, if you can believe that!

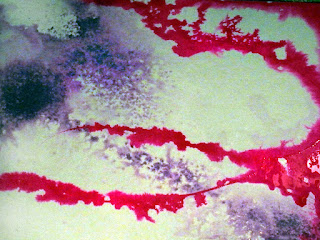
For the first example shown below, I worked on acrylic paper from a pad, spraying a little purple fluid acrylic from a spray bottle. Then I used the applicator tip of the Carmine color of Holbein ink. It's a powerful pigment! Then I let that dry.

tute, tutorial, how-to
I actually liked this first step better than the result later.
Next, I created a few puddles of rubbing alcohol and added alcohol ink. The effect, shown below:
Guhin, blog
I do like the colors together.

Thanks for viewing Mixed Media Manic!
 
(Full disclosure: This post is derived from a much earlier one. And new stuff is coming, I promise.)

Saturday, September 5, 2015

GUEST BLOGGER: SUPER TALENT LYNN EDWARDS

Lynn Edwards is an abstract painter, mixed media artist and art instructor living in the greater Atlanta area. Her work is held in both private and corporate collections and has been leased by Disney/ABC Television Group. She is represented by 2Rules Fine Art, Marietta, GA. Her studio is located in an idyllic setting surrounded by woods and wildlife, the former providing boundless inspiration and the latter, endless amusement.


mixed-media, art
Lynn


mixed-media, sold
Collage, 8 x 10.5" total, ©2015 Lynn Edwards

Above, Holyrood, acrylic, ink, found and hand-painted papers on watercolor paper (visit http://www.dailypaintworks.com/artists/lynn-edwards-4672/artwork if interested in acquiring) .               

Lynn says,"Sometimes artistic inspiration comes from strange places. This was true for Holyrood.  One day my husband, who was in the paper recycling business, spotted a very old, tattered volume moving up a conveyor belt toward a shredder. Knowing how much I love vintage books, he snatched it just in time and brought it home to me. It turned out to be an original volume from a series of biographies of eminent Scotsmen, printed in the early 1800s!

One page spoke of Holyrood, the castle where Mary Queen of Scots once resided. I've always been fascinated by that period in history and by that monarch's tragic story. So I used this page as the basis for my collage, using bright, cheerful colors as a sympathetic counterpoint to Mary's life, which was filled with loss and controversy.


LynnEdwards
Mountains, acrylic, ink, metal and collage
on 7 x 5" watercolor paper
(Collection of Mr. and Mrs. D. Fletcher)  
©2015 Lynn Edwards

art, blogs
Blaze, acrylic on 12 x 12" gallery wrap canvas ©2015 Lynn Edwards
(Note from Paula: See  http://www.dailypaintworks.com/artists/lynn-edwards-4672/artwork if interested in acquiring the wonderful painting above. Also be sure to visit Lynn's two sites!) Website: http://www.lynnedwardsart.com
Blog: lynnedwardsart.blogspot.com


The mixed-media painting shown below
is called Before the Dawn. It's 7.75" square
on watercolor paper, mounted on a 10"
square cradled wood panel.(Collection of
the artist. Copyright Lynn Edwards.)
ink, acrylic, painting
Inks and acrylics

Saturday, June 14, 2014

MAKE YOUR OWN ART PAPER...EASY!

 Papermaking can be fast, easy, and (best of all) cheap! You can do it in your own kitchen or studio with very little equipment, most of which you already own.
mixed-media
Dried flowers have been incorporated into the paper sheet!


There are many good papermaking books you could read, & they usually mention immersing a mold and deckle in slurry (watery pulp).

how-to, tutorial
Large, clean sponges and embroidery hoop.
Instead, I use a round embroidery hoop
stretched with organdy!
The hoops come in various sizes 
& in ovals, too. Or you can
make your own screen with, um,
actual window screening. Either stretch the
screen in an embroidery hoop or dispense
with the latter and simply secure the screen
edges with duct tape.

To make the pulp, I've used molded cardboard egg cartons, junk mail, recycled office paper, clean paper towels, used gift wrap, and an old phone book. Other papers that work well include grocery bags, construction paper scraps, paper napkins, newsprint, and tissue paper.

Materials:
· Recycled papers
· Large pan (like a dishpan)
· A blender
· Embroidery hoop stretched w/organdy or organza, or window screening w/ taped  edges
· Sponges, cloth rags, and towels
· Colander or strainer
· Metal spatula


handmade+paper
Two thin layers with plants & holes.
Optional materials:  
· Glass or Plexiglas panes
· Colorants
· Turkey baster
· Cookie cutters
· Plant materials
· Cooking powders, herbs and seasonings
· Ribbons, string, doilies, glitter, cheesecloth, confetti, etc.

Directions:
Tear papers into small pieces and soak them in water overnight to soften. Make a large batch of about four cups. For a whiter, softer paper, use toilet tissue, facial tissue, or paper towels, none of which require overnight soaking. (Of course, with such acidic papers you won't create a high quality, archival product.)

Note: I have created plant-based pulp in the past, and mixed in a little paper pulp with it for better bonding. I cooked plant materials with firewood ash and rinsed well before blending the pulp. Study up elsewhere on methodology and precautions to take if you plan to make pulp from plant matter.
how-to, tutorial
As sheets dry, you can form wavy edges if desired.
Don't burn out the blender!
Fill the blender about ¾ full of plain water and add ½ cup of pre-soaked, softened paper bits. Begin with short bursts of the blender on a coarse setting. Be careful that you don't overwork the motor. Gradually progress to higher speeds. Blend until the pulp has a soupy consistency. Sometimes you might even wish to deliberately stop blending while you can still see bits of papers, so they will show in the finished product.

Pull a sheet:    
While there are several other methods of pulling a sheet, here's the simple one I use: Fill a large, deep pan halfway with water and then partially submerge the hoop-screen in it. Next, pour thin pulp directly from the blender into the hoop. Wiggle the hoop a bit to swirl the pulp and distribute it evenly, and then lift the hoop from the water.

tutorial, mixed-media
It's fun to incorporate gauze, decorative fishnet, or cheesecloth into paper pulp. With the pink paper shown here, I just picked up wet pulp with my fingers and packed it onto orange fishnet here and there, pressing it firmly into—even under—the netting haphazardly.


tutorial, how-to, art+paper
Halloween gauze + paper pulp in a hoop.


"Couching"
(lifting sheets of handmade
paper onto the surface on which they will be dried) is traditionally done with felts, but a pad of newspaper, a blanket, or a towel works, too. While I do rest the hoop on a dry towel while sponging excess water from the pulp, I do not make a pressed stack in the usual manner.
1. Place the pulpy hoop on a towel. Press the pulp flat with a damp synthetic sponge. One sponging is not enough. Wring out the sponge well and repeat, perhaps with a different, dry towel now underneath. Absorb as much water as possible as you press around the inside of the hoop. This forces the pulp to flatten and bond somewhat to the screen.
2. Instead of using pressing boards to keep my sheets flat, I apply a very easy technique: Invert the hoop (with the flattened pulp still stuck to it) over onto a pane of glass or even directly onto a non-porous countertop!
3. To release the sheet from its "mold" and to form a tight bond with the hard glass or Formica surface, rub all over the back of the organdy "screen" (the underside is now facing up) with a dry sponge or cloth. Pay special attention to the edges to liberate the sheet from the hoop.
4. Then remove the hoop and press the damp sheet very firmly to the glass or the countertop. Thin sheets stick very well and dry flat. In fact, later you may need a metal spatula to free them (carefully) when they are thoroughly dry. If warping does occur, it will appear at the edges first. Place a heavy weight on top to flatten, or cover the sheet with a pressing cloth and iron it flat at a medium heat setting.


handmade, papermaking, weaving
Besides handmade paper, this weaving includes fibers,
fabric, bamboo skewers, art paper, and gold leaf.


Adding color:
Coloring agents can be added either to pulp in the blender or to pulled sheets. Fabric dye is best (in my opinion) but ink, tempera paint, watercolor, food coloring, even liquid acrylic paint can be used for pigment. In addition, some tissues and construction papers bleed their color into the pulp. (Several of the coloring agents mentioned here are not colorfast or lightfast.)
You can combine small batches of different-colored pulps into a single artwork, too. Cookie-cutter shapes are easy to make, and they can be pieced together, mosaic-style, while the pulp is wet.  Or do a web search on "pulp painting" and you'll learn how to create a free-form paper piece with a teaspoon, eyedropper, or turkey baster. Here's a link to another way (NOT free-form), using stencils: http://www.denisefleming.com/pages/papermaking.html

Other additives:
For color, scent, or added interest, the following materials can be thrown into the blender with the pulp, or pressed into a "finished" sheet that needs something extra: curry, turmeric, or chili powder; dried dill, basil, oregano, parsley, rosemary, or thyme; ground cinnamon or paprika; and saffron. Try tea leaves, instant tea or coffee, or coffee grounds, too.
You can also add confetti, glitter, or small pieces of snipped threads. Throw in a little dryer lint if you wish! TIP: Use lint from a load of denims for blue specks.

Texture techniques:
Emboss (or deboss, depending upon which side of the handmade paper you use) by forcefully couching a wet sheet directly onto a thick stencil, plastic template, cord, hefty crocheted doily, or textured rubber matting. Leave the textured articles in place, with a weight on top, until the paper has dried.
Another idea is to embed dried leaves, flower petals, ribbons, and more between thin layers of wet pulp. Or deliberately wrinkle the couched, wet sheet and allow it to dry that way. Fold, pleat, mold, and sculpt the paper!
TIP: When you are finished, strain the slurry and store leftover pulp covered in the fridge. Never, ever, EVER  pour it down the drain!
Use your dry handmade paper for journal pages, book covers, collage materials, and many other creations. It's wonderfully absorbent, so dye it, paint it, and draw on it. Cut it, pierce it, sew or weave with it.

P.Guhin

Saturday, June 22, 2013

DECONSTRUCTING HANDMADE PAPERS TO MAKE A NEW ARTWORK

WHAT TO DO WHEN YOU DON'T LIKE A WORK ON PAPER!

I was experimenting one day with adhering layers of paper together and then tearing some of it off. I didn't care for one result, so I painted it mostly red with acrylics. When that was dry, I added white, black,  and blue paint, as shown below.
how to, how-to, tutorial
Not my best work, by a long shot!


I still didn't particularly like the result, but rather than add more paint, I cut it up into squares and rectangles of assorted sizes. Then I collaged them all together, and got the artwork below. 
low-cost art, frugal art
Which one do you like best?


Friday, January 13, 2012

Be a Follower to Qualify for this Drawing...a Free Book!

The prize for this contest is my most recent book, just out this month! 


Simply become a follower of this blog (if you're not already) and you'll be entered in the random drawing.


This offer is good until Friday evening, Jan. 20, 2012, when the winner of the blog candy (book prize) will be announced.


Winner must email me his or her snail mail address (post office address).


Monday, June 27, 2011

TWICE THE DECORATIVE PAPERS WITH TISSUE AND PAINT!

MATERIALS:
  1. Thin, inexpensive tissue papers.
  2. Dyes, liquid watercolors, dye-based inks, or thinned acrylic paints.
  3. Brushes.
  4. Smooth watercolor paper.
TECHNIQUE:
  1. Crinkle the tissue and spread it out over smooth watercolor paper.
  2. Slap on vivid, strong color right over the wrinkled tissue.
  3. Let dry overnight. (If the acrylic paint is not thinned enough, it may stick if left on for more than an hour or two.)
  4. When you remove the tissue, BOTH it and the watercolor paper should show wonderful batik-like patterns. If you are disappointed in the results, do try again with other tissues, papers, inks, or paint media.
The result is shown at right, below. The tissue used is at left.

Friday, June 10, 2011

TWO EASY WAYS TO MAKE DECORATIVE PAPER

Both these methods are so simple, and fast too! Well, the second technique has some drying time, but it IS quick to make.


Deli wrap adds translucence to this first idea. I photographed it with some lacy black  paper underneath (in the upper left corner) to show how sheer it is.


I simply used water and alcohol inks to create a random, distressed-looking design.


The second method requires sturdy paper or card. Use a painting knife to apply either texture paint (as shown here), molding paste, or heavy gel medium.


While it's still wet, embed tiny beads. These red ones are very small no-hole glass beads. I also used antique gold glitter, which looks white in the photo below.

When dry, seal with clear fluid acrylic medium.

Sunday, May 29, 2011

IMPRINTING YOUR OWN PAPERS TO USE IN COLLAGE

Both these techniques are quite simple to do, and the results can be startling!

Technique #1: Soak good watercolor paper in clean water, place it on a hard surface, and apply plenty of vivid, strong liquid watercolors. Lay absorbent textured materials into it. Examples include crocheted fabric, swirls of string, or open-weave burlap. Add more full-strength paint as desired. Place a sheet of glass on top and let dry overnight. If necessary, add a book on top of the glass to weigh down your creative sandwich!


Technique #2: Buy cheap colored tissue (the non-colorfast kind!) in strong colors, tear pieces as desired, and arrange them on damp, smooth watercolor paper. Spray with more water as needed. Then cover with the sheet of glass as before and let dry overnight.


Experiment with both these methods and do try variations, too! Much luck to you.
(I'll publish your successful attempts at either of these here, with you credited, of course, if you wish to send me good quality images.)

Friday, April 29, 2011

BEAUTIFUL BATIK-LIKE EFFECT IS SOOOO SIMPLE TO DO!

White drawing paper is fine for this technique. Wet it on both sides (I dunk it in the sink) and then crumple it into a ball.


Open it up gingerly, without tearing
the paper. Lay it flat onto freezer paper or newspaper. Paint with vivid, full-strength watercolors and a wide brush, all over the paper. Even this side (below) is rather nice, isn't it?


Finally, flip the paper over and take a peek at the back...you may prefer that side.