Showing posts with label quick. Show all posts

Sunday, December 22, 2019

Make Your Own Animal Print Sneakers (& More!)

ACRYLIC PAINT and INEXPENSIVE WHITE TENNIES = EASY COW-PRINT SHOES

 I'm seeing a lot of cool athletic shoes, dressier ones too, with zebra, leopard, and other prints. So this idea came to me to embellish plain white canvas shoes with black acrylic paint. 


I used a ratty, stiff old brush to create the effect of animal hairs.
 
 Four years ago I posted several other, similar ideas. See below. 
Splat!
I used a sponge dauber, of course.
Thanks for viewing this craftsy post. Please check in again for a step-by-step tutorial on an assemblage!

Monday, February 8, 2016

USE UP YOUR PAINTED PAPERS IN A PATCHWORK COLLAGE

You have them...you know you do...saved pieces on which you experimented, or scraps from failed works. Maybe you even keep papers on which you've tried out colors or wiped your brush!
This tutorial describes my own, simple method for creating a quick collage. Use it as fun inspiration, motivation, as a lesson for kids, or perhaps even to make a serious finished artwork! You can also add mark-making if you feel some areas need more. OR you might borrow from the finished design to compose a painting!


tutorial, how-to
A "Primary-ly" red, yellow, and blue color scheme.
1. Go through your stash of your own, original decorative papers. You might already have a color scheme in mind...I did! Gather them together, and check to see if you've included a full range of values from near-black to white. TIP: No need to stick with brights, as I did...all neutrals are terrific for this. Or complementaries like orange and blue, or whatever grabs you!
collage, tutorial, MixedMediaManic
Not a collage, just a sampling of papers, but I sorta like it.
2. I went with cut edges and geometric shapes, although torn, organic shapes work too. Aim for a variety of sizes (and shapes). Arrange on a sturdy support and audition a number of compositions before gluing anything down. Strive for balance! And unity! Are there some similarities and some differences? Is the finished collage harmonious? HAVE FUN!


Saturday, November 15, 2014

TWO FIGURE DRAWING ACTIVITIES TO PRACTICE

FAST SKETCHING PROJECTS TO
HONE YOUR SKILLS
 The first is done with a peeled crayon, used broadside, although you could use stick charcoal, pastel, or any other medium in stick form.
You know how school kids love to be the one posing instead of drawing someone else? At home you can enlist someone to be your model, too. Mass in the figure from the center outward, working on the form but keeping an eye on the proportions, too.
Guhin, student, art, drawing
Work in a size that's comfortable for you.
Scribble outward until you reach the outer edges of the form. When you have the entire mass built up, go back and press harder in the bulkier areas to give visual weight.

 Our second art activity is contour drawing, looking at the outer edge in contrast to the massed-in figure above. A felt-tip or rollerball pen works good for this. You must concentrate on the figure's boundaries! Do more than one pose, and work quickly.
 
student, beginner, quick, draw
These are not strictly continuous contour examples.


Continuous contour drawings are done without lifting the pen from the paper. Blind contour drawings are done without even looking at the paper! Regular continuous contour drawings allow you to peek and to lift the pen sometimes!
Guhin


Friday, January 24, 2014

LESSONS STRICTLY FOR ART TEACHERS & PARENTS!


This is the first in a series of fast and fun drawing activities 
for kids,beginning with line.            

Here you'll find drawing prompts that are authentic and economical, foolproof and fun. These are experiences in creating two-dimensional works of art with "dry" media, not paint or glue. No elaborate preparation is required!
            These ready-to-use lessons are easy-to-follow, step-by-step instructions for children in elementary and middle school. They allow young artists to work on their own with the adult as a facilitator only.  They're tried and tested, meaningful tasks to engage the interest of the creative kid.
            You'll discover that the fifteen-minute marvels in this series are a convenient, educational way to use short periods of time productively.  And most of the artworks can be finished in about a quarter-hour or less.
            We begin with the fundamentals in the first posts—the basic art elements. Each post will highlight a different component. Line, the principle factor in drawing, is the focus of this first section.

            A word about pencils: A common 2B pencil will suffice for most drawings. However, for deep, dark gradations and shadows, try a special 4B or 6B. An HB (or any H pencil) is too hard for softly blended shading effects.

Line: a continuous mark made by a tool onto a surface.                                          
TO THE LETTER
art lesson, art teacher, student
Materials:
·        White drawing paper, pencil &/or other drawing tools
 Have you ever looked at the lines and shapes of alphabet letters and pictured other things? You can “see” a snake in the letter “S” if you try!
What to do:
  1. Lightly draw a letter—either capital or lower-case—on a large piece of paper.
  2. Squint your eyes and imagine the letter as part of something else. Draw in new lines and shapes, and add more on to it to finish the letter-picture. 
Questions to Ask Yourself:
            Is the artwork as complete and interesting as you could make it? Could you draw a number instead of a letter, and make it part of a brand-new picture?
lesson, student, art

TAKE A MARKER FOR A WALK
Materials:
· White drawing paper, markers 
What to do:
1. Draw a shape (an animal, a person, a flower, or any other outline) in the center of a large sheet of paper. Shapes are made by enclosing an area with a line. 
2. Next, "take a marker for a walk" around the shape, as closely as possible without touching it. The marker line should go all the way around the first shape, until it touches the place where it began. Then choose a different color marker and create another outline just outside the first, and then another, and another, without touching the other lines. If you can, use markers of different thicknesses, too. Some wide, some thin. Draw around the shape again and again until the page is filled with lines!

For Your Understanding:
       When you repeat lines over and over, you make a rhythm, a regular pattern that lends a feeling of movement. Did you begin with an interesting shape? Did you fill the page with many lines?

WHAT CAN THESE LINES BECOME?
Materials:
·        White drawing paper, pencil &/or other drawing tools
What to do:
  1. Lightly draw a squiggle on a large piece of paper. (See those below.) The line can be curvy or sharp and all angles.
  2. Squint your eyes and imagine the squiggle as part of something else. Draw in new lines and shapes, and add more on to it to finish the picture. 
activities, art,
NOTE: You mixed-media artists out there, please remember that, besides this series of kid's art activities, I will continue to post material just for you!
Paula Guhin, MixedMediaManic
Thanks for stopping by!


Saturday, February 2, 2013

EASY MARBLING TECHNIQUE WITH SHAVING CREAM

CALL IT WHAT YOU MAY, TO MARBLEIZE OR TO CREATE A MARBLING EFFECT IS EASY!
This is a simple, lovely way to make your own decorative paper.

Supplies and Materials:
  • Large shallow pan (but I used a sheet of aluminum foil!)
  • Cheap shaving cream
  • A spatula and/or a knife
  • Alcohol inks (or experiment with fluid acrylics or other inks!)
  • White or light-colored papers
How To:
    shaving cream, marbling, how to marble
  • Spread a layer of shaving cream about the size of your paper.

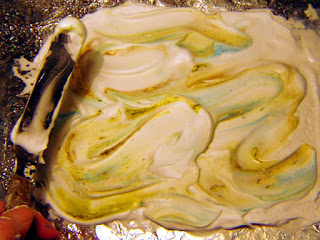
  • Dot the ink or inks of your choice on top. Here I used alcohol inks, below.
shaving cream method

  • Cut the knife through the shaving cream and the dots, dragging them into a swirling pattern.
shaving cream, marbling effect
By using the spatula FLAT, I rather messed up!


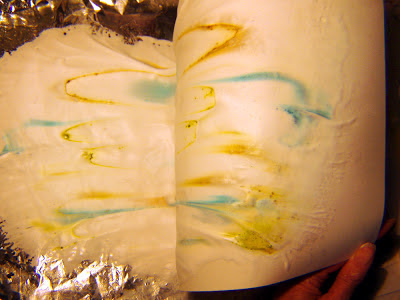
  • Lay clean paper over the design and press down for good contact. Let sit for a moment. Then peel the paper off from one edge to the other. 

tute, tutorial, easy lesson
Alcohol inks may provide less graphic results.

marble, shaving cream method


  • You will need to scrape off the excess shaving cream. SAVE the excess with the remainder of your used shaving cream, and you can do it all over again with more ink dots and another sheet of paper!
art lesson, easy, simple, marbleize

art blog, mixed media blog, Paula Guhin


Monday, October 1, 2012

EASY HALLOWEEN CRAFT, COOL COSTUME IDEA!

Get an old pair of sunnies at the thrift shop, and a bag of plastic creepy-crawlies at the dollar store, and make a c-OOOO-l pair of shades for cheap!
altered art, holiday fun
This is altered art at its most fashionable!


I used a hot-glue gun and finished this project in no time.
assemblage, easy holiday project
For this spooky project, try worms or snakes, too!


Friday, October 7, 2011

ART ACTIVITY WITH KIDS or for anyone, really!

                             Squirt, Squish, and Squeegee! 
This elementary art project is so fun and so cool, adults will want to try it, too. 
It leaves a lot to chance, but the results can be serendipitous and gorgeous. Best of all, there's no mess and no clean-up!
Materials:
  • White illustration board or foam core, 8x10"
  • Tubes of cheap acrylic paints
  • Small squares or rectangles of matboard or cardboard
  • Clear adhesive shelf liner

Technique:
  1. If you're working with a roomful of youngsters, have them sign their name on the back of the cardboard or foamcore first!
  2. Have them help each other (or use an assistant) to squeeze out three or four colors of paint on the cardboard, somewhere near the center but not touching each other. Let the kids choose their own color combos. Tell the kids to use no more of one color than they would put on their toothbrush if the paint were toothpaste. (This sounds silly, but remind youngsters that the paint is not edible.)
  3. Again, help younger kids or let them help each other with a piece of see-through adhesive shelf liner that has been cut large enough to cover the 8x10" board. Start peeling the sticky paper at one end and attach that to the board, then cover the entire board, right over the paint blobs. Try to press as you go, to avoid big air bubbles. (Note: clear acetate can be substituted for the stick-on plastic, since the paint will eventually dry at the edges and adhere the acetate to the board.)
  4. Now for the really fun part! Grab a small square of cardboard or matboard and spread the paint beneath its plastic covering. Press hard. It mixes the colors where they meet, and makes for exciting whorls, waves, and octopus shapes. Other tools that move the paint around under its covering include credit cards, hair combs, putty knives, and tile adhesive applicators.
If some of the white background shows through in a few places, it's likely a good contrast with the paint. If you want to keep messiness at a minimum, be sure the children stop expanding their paint designs before they squeeze them right out of the edges.
One of the great things about this lesson is that the kids can take them home the same day. But you'll want to display them first, because they are so interesting and gorgeous!


    Monday, June 27, 2011

    TWICE THE DECORATIVE PAPERS WITH TISSUE AND PAINT!

    MATERIALS:
    1. Thin, inexpensive tissue papers.
    2. Dyes, liquid watercolors, dye-based inks, or thinned acrylic paints.
    3. Brushes.
    4. Smooth watercolor paper.
    TECHNIQUE:
    1. Crinkle the tissue and spread it out over smooth watercolor paper.
    2. Slap on vivid, strong color right over the wrinkled tissue.
    3. Let dry overnight. (If the acrylic paint is not thinned enough, it may stick if left on for more than an hour or two.)
    4. When you remove the tissue, BOTH it and the watercolor paper should show wonderful batik-like patterns. If you are disappointed in the results, do try again with other tissues, papers, inks, or paint media.
    The result is shown at right, below. The tissue used is at left.

    Friday, June 10, 2011

    TWO EASY WAYS TO MAKE DECORATIVE PAPER

    Both these methods are so simple, and fast too! Well, the second technique has some drying time, but it IS quick to make.


    Deli wrap adds translucence to this first idea. I photographed it with some lacy black  paper underneath (in the upper left corner) to show how sheer it is.


    I simply used water and alcohol inks to create a random, distressed-looking design.


    The second method requires sturdy paper or card. Use a painting knife to apply either texture paint (as shown here), molding paste, or heavy gel medium.


    While it's still wet, embed tiny beads. These red ones are very small no-hole glass beads. I also used antique gold glitter, which looks white in the photo below.

    When dry, seal with clear fluid acrylic medium.

    Friday, April 29, 2011

    BEAUTIFUL BATIK-LIKE EFFECT IS SOOOO SIMPLE TO DO!

    White drawing paper is fine for this technique. Wet it on both sides (I dunk it in the sink) and then crumple it into a ball.


    Open it up gingerly, without tearing
    the paper. Lay it flat onto freezer paper or newspaper. Paint with vivid, full-strength watercolors and a wide brush, all over the paper. Even this side (below) is rather nice, isn't it?


    Finally, flip the paper over and take a peek at the back...you may prefer that side.

    Saturday, March 12, 2011

    20 Fast and Fun Drawing Projects!

    In a rut, sketching the same old thing all the time? Break out of the box!
    Maybe some of these ideas will excite your muse.

    1. Use a small mirror and draw your own eyes. Fill the page.  

    2. Draw a clothespin and add shading. Work large.
    3. Draw an underwater scene. Add sunken, man-made items.
    4. Design your own piece of jewelry.
    5. Sketch a scene on another planet. Use every value from white to black.
    6. Crumple a sheet of paper and draw it, wrinkles and all.
    7. Make up your own futuristic vehicle and draw it, adding lots of details.
    8. Draw a composite animal made up of the parts of several real animals.
    9. Combine a man-made object with something from nature. Add texture.
    10. Sketch a dragon. Add a castle or a knight in the background.
    11. Combine a human face with that of an animal.
    12. Draw the view outside the window.
    13. Sketch the inside of your locker or closet. From memory.
    14. Draw a shoe or a pair of shoes.
    15. Sketch a glove or a hat.
    16. Draw a composite machine made of parts of lots of different machines.
    17. Draw your own hand. No tracing!
    18. Sketch the back of the head of a person sitting in front of you.
    19. Draw an empty candy wrapper.
    20. Make a black and white design based on a small section of a map.