Showing posts with label painted paper. Show all posts

Thursday, July 2, 2020

SALE! GET THIS AWARD-WINNING ART BOOK (NEW! Never used!) FOR CHEAP ON ETSY!

HOW-TO FOR BOTH ADULTS AND KIDS!
HUNDREDS OF FULL-COLOR PHOTOGRAPHS TO INSPIRE YOUR CREATIVITY.
Use the many techniques and ideas in your own mixed media art, journaling, even for scrapbooking.
My Etsy shop is called guhinp, and here's the link to the book:
 

Thursday, April 2, 2020

MIXED MEDIA COLLAGE - PAINTING ON CANVAS

I WOULD LOVE A NIFTY TITLE FOR THIS NON-OBJECTIVE WORK.

GOT A TITLE SUGGESTION 

FOR THIS NEW, MIXED-MEDIA WORK?

STEP-BY-STEP FROM SKETCH TO FINISHED PROJECT

MY ORIGINAL SKETCH...I thought it would be horizontal!

I wanted a limited color scheme of cream, light and dark gray, and cool red in a variety of values. I used acrylic paint, textured papers, my own decorated papers and more.

The photo shown below is in progress.  I goofed by leaving a very dark area in the center.

At this point I hadn't yet decided to finish the piece as if it would hang vertically.
The finished work.

Note (above) the several small, brighter accents as focal points. 

Please comment if you have a good idea for a name for this. 

Or if you like it!   THANKS!

Monday, February 8, 2016

USE UP YOUR PAINTED PAPERS IN A PATCHWORK COLLAGE

You have them...you know you do...saved pieces on which you experimented, or scraps from failed works. Maybe you even keep papers on which you've tried out colors or wiped your brush!
This tutorial describes my own, simple method for creating a quick collage. Use it as fun inspiration, motivation, as a lesson for kids, or perhaps even to make a serious finished artwork! You can also add mark-making if you feel some areas need more. OR you might borrow from the finished design to compose a painting!


tutorial, how-to
A "Primary-ly" red, yellow, and blue color scheme.
1. Go through your stash of your own, original decorative papers. You might already have a color scheme in mind...I did! Gather them together, and check to see if you've included a full range of values from near-black to white. TIP: No need to stick with brights, as I did...all neutrals are terrific for this. Or complementaries like orange and blue, or whatever grabs you!
collage, tutorial, MixedMediaManic
Not a collage, just a sampling of papers, but I sorta like it.
2. I went with cut edges and geometric shapes, although torn, organic shapes work too. Aim for a variety of sizes (and shapes). Arrange on a sturdy support and audition a number of compositions before gluing anything down. Strive for balance! And unity! Are there some similarities and some differences? Is the finished collage harmonious? HAVE FUN!


Friday, May 29, 2015

FOLLOWERS OF THIS ART BLOG CAN WIN! CONTEST!

CONTEST NOW CLOSED.
The prize is an art book packed with
techniques & methods for you to try!
free, giveaway, prize  
Packed with full-color photos!
(Winner was Julie Mortillaro.)


Saturday, May 9, 2015

MIXED MEDIA TECHNIQUES FOR COLLAGE, BACKGROUND, & MORE

I know the two photos below might look unappetizing to some people, but the methods behind them can be very useful!

But first, let me ask you readers about a couple of techniques I tried and failed at:

Have any of you ever had any luck with stamping laundry bleach onto dark papers? My stamps dripped, which could be remedied, perhaps, with gel bleach. And regular bleach is so thin and runny that my "prints" were pretty bad. Maybe if I had some sponge stamps! Yeah, that's the ticket!

Then I tried another idea, hot glue stamped with impressions. But the darn glob hardened too quickly, and my gadgets got stuck in the glue! I've had good results with drips that I then painted with metallic. But stamping a big glob was another fail for me.

NOW FOR THE TWO TECHNIQUES I LIKED...
Dry walnut ink crystals are soooo cool. I know you can get liquid walnut inks in sprays, too, but the crystals are so versatile. Sprinkle them randomly on damp paper, or sprinkle on dry paper and spatter them with water or thin paints. Then you can blot them or not, or tilt the paper for drips (or not).
P.Guhin, art+blog
I actually sprayed the crystals with Color Mists! Subtle but nice.
Chalk powders such as Pearl Ex can also be misted or squirted with water or thin color.
For this example I held the paper up for a few runs in the effect.

Guhin, mixed-media
      You might even use scrapings from chalk pastels.
I wouldn't overdo with the walnut ink idea, but in small doses it might be nice! And the pretty powders make a gorgeous background! I hope you'll try them, and do comment if you've had good luck with bleach-stamping or impressing hot glue. I'd love to see some great examples!


Sunday, May 18, 2014

IMPRINTING: A GREAT WAY TO ADD VISUAL TEXTURE!

USE FLUID PAINTS TO TRANSFER PATTERNS

(P.S., The winners of yesterdays's giveaway were Gil in the UK and Susie! Congrats to them.)

The imprinted paper shown below was done with damp watercolor paper, a sheet of glass, and a crocheted piece. I pressed the lacy fabric to the paper before flooding it with intense watercolor. Then I quickly put the glass on top and a heavy book on that! The next day I removed the "sandwich."

method, how-to
Not a finished work, but paper to be used in collage - mixed-media.


For the "fishy" painting, I cut a plastic bag into curvy shapes
(see the light, fish-like forms below) and lay them on the damp
paper first. They stuck there and formed a type of resist. You could
also use shards of glass or Plexiglas.
texture, tutorial
I used a fishnet...how appropriate!

Thursday, April 18, 2013

PLAYING WITH PAPERS AND PICTURES - Altered Art Mixed Media Techniques

Let's Color, Kids!
Altering papers and printed images to use in collage is easy: Stain, paint, tear, stitch, dye, burn, bleach, or scratch them for effect. Of course you can create dimensional paper, too, by folding, pleating, crumpling, and more.

paper techniques
Rolled, crumpled, creased, pleated, scored.


altering paper, art techniques
Strong coffee, wet tea leaves, walnut crystals, alcohol ink.


Tip:   I saturate papers with rubbing alcohol before applying alcohol inks. Then I immediately soften and spread the ink with a brush or piece of felt dipped in rubbing alcohol.

collage papers
The finished papers after colorizing them.
Alter lab-processed photographs with laundry bleach. This is not an archival technique, but it's fun! Try a gel bleach pen or a cotton swab dipped in liquid bleach. Apply it selectively to lift areas of color. When you've achieved the desired effect, rinse the print under lukewarm tap water and blot dry with a lint-free cloth. (Note that some papers and pigments resist bleaching action. Also, take all the necessary health precautions when working with bleach.)
 
bleaching and scratching
Bleached spots at left, scratched selectively at right.


Abrading a surface lends an aged, distressed appearance. To scratch the emulsion of a commercially-processed photograph, soften it in a tray of warm water for a minute. Blot it on a hard, flat surface and scrape away with a large needle, nail, or other scratch tool. Sandpaper removes large areas quickly. The light-colored marks show up best in dark areas of the photo.

And finally, do try this: Décollage is an art term that refers to a cutting and tearing technique based on the appearance of layered posters on billboards. The result leaves shredded papers, revealing portions of the images and text underneath.

mixed media collage
Decollage example


art blog, Paula Guhin

Friday, March 8, 2013

ALTER METAL-LEAF WITH THIS TECHNIQUE


"LEAF" IT TO METALLIC FOIL!  
Want to "foil around" and create an effect to use with paintings, collages, and more?

I used a rub-on sheet of gold leaf, shown below, and patina solution.
metallic foil, antique effect
Gold leaf as rub-on sheets.
tute, how-to, how to
Other patina solutions are available, too!
Caution: the antiquing solution eats through aluminum foil, so use plastic, waxed paper, shelf paper, or layers of old newspapers on your working surface!

In my experiment, I applied the copper metallic surfacer paint to the right side of my gold leaf paper, and the patina green solution directly to the left half.
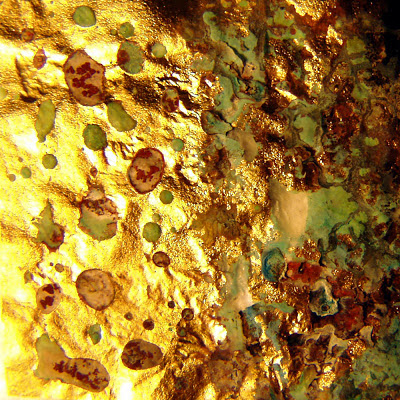
mixed media, art paper, technique
I prefer the right side, using both the coppery surfacer and the patina product.
 When the coppery paint was still tacky, not dry, I applied the patina solution to that side as well. Both sides were left overnight to dry.

Above is the result. Since it would flake off and perhaps tarnish, I sealed the surface with a spray varnish.


mixed media art blog

blogspot art blog


Saturday, December 22, 2012

HOW TO USE THE RINSE AID TECHNIQUE


CREATE A COOL EFFECT WITH AN EVERYDAY DISHWASHER PRODUCT!

MATERIALS AND TOOLS:
  • acrylic (or watercolor) paint
  • water
  • paintbrush
  • canvas or paper
  • dishwasher rinse aid
  • rags
  • gel medium (optional)
  • squirt bottle (optional)
This lesson will show you an easy how-to, and you can use the effect you get as a cool background! 
Or you can do it on paper and use the dry paper later in a collage project.
  1. Cover the canvas or paper with acrylic paint in the color of your choice, to seal the surface. (You can also seal the surface with gel medium.) Let dry. 
  2. Select a contrasting paint color (much lighter or darker than the first) and thin the acrylic paint with water. 
  3. Apply the thinned paint quickly, and while it is still wet, drip the rinse aid into it.
instruction, advice, tips
Beginning the rinse aid technique

Note: You can use a thin brush to draw rinse aid lines, or make large spots of the rinse aid run by tilting the paper or canvas. You can even saturate a sponge with rinse aid and stamp it onto the wet paint.


The effects you get might be satisfying this way (especially with watercolors!), but here's another tip: Use a damp rag or paper towel to wipe off the surface.


technique, tute
Example of  the technique using acrylic paint on mixed media paper

More advice? If you aren't happy with your results, repeat the process with a third color of acrylic paint!

Experiment with different color combos on a variety of surfaces. 


The example below was done with watercolors.

tutorial
Spray the paper with water first for best results.

Friday, February 10, 2012

How to Create a Mock Leather Effect

My most recent book at the time of this posting is Creating Decorative Papers (available from Stackpole Books or Amazon.com, amongst others). There are two different methods in the book regarding faux leather. One of them is pictured here, and it's really easy!


You can use this 
distressed leather effect 
on a book cover,
 in a collage or collage/painting, 
even on your walls or wood furniture!

Friday, February 3, 2012

Painting with a Roller, Part II

The first example is similar to one shown in my last post, done with a hard rubber printmaking brayer (or a foam roller). Remember, you can curve or zig-zag as you roll on the ink or paint.


The next photograph, below, demonstrates the use of a cheap foam roller to which I took a pair of scissors! Just cut out gouges here and there in the foam, at random or symmetrically. Then ink up the roller evenly on a pane of glass or on a flat sheet of metal, plexi, or china. Use block printing ink, acrylic paint...even tempera will work (but it won't be permanent).
Here, I allowed each color to dry before proceeding with the next, but how about THIS for an idea: Ink your roller with two different colors, one on each side, and roll them simultaneously? Choose colors that work well together.

What an easy way to create decorative papers!


Saturday, January 28, 2012

PAINTING PAPER: A PANOPLY OF FUN METHODS!


                                        The sampler pictured above is from the book Creating Decorative Paper. 

Painting with Rollers or Brayers 

This technique is simple and effective. The results can be stunning.

A brayer is a printmaking roller that's very handy for creating special effects on paper or canvas, but you can use a regular old paint roller or a sponge or foam roller, too.
  1. Spread old newspapers on your work surface. 
  2. A large piece of glass or plexi (with the edges taped for safety) can serve as the flat surface upon which to spread your paint or printing ink.
  3. Roll the brayer in the paint/ink until it's well-covered thinly, not too juicy.
  4. Roll a straight or curvy application on your paper of choice. Repeat. Leave some areas unpainted if you wish.
  5. Add a different color to the glass and mix it with the previous color if desired. Or clean the brayer and the glass and try another color entirely.
(Here, a few sparkles of the original white paper have been left untouched...er, unrolled!)
I plan to post several more easy variations using paint rollers very soon, so please check back!  

Friday, January 13, 2012

Be a Follower to Qualify for this Drawing...a Free Book!

The prize for this contest is my most recent book, just out this month! 


Simply become a follower of this blog (if you're not already) and you'll be entered in the random drawing.


This offer is good until Friday evening, Jan. 20, 2012, when the winner of the blog candy (book prize) will be announced.


Winner must email me his or her snail mail address (post office address).


Saturday, August 6, 2011

Using Paste Wax as a Resist

I painted a metallic peachy color on watercolor paper using acrylics first. When that was dry, I applied regular ol' Johnsons Paste Wax in swirly shapes. Then I painted more acrylics in two other colors and allowed them to dry. Finally I wiped off the paste wax and admired my newly-decorated paper!
Now for a shameless plug: Watch for my book called Creating Decorative Papers, to be published by Stackpole in 2012!


                                                                       Brought to you by 

Friday, July 8, 2011

DRAWING GUM MAKES A GORGEOUS PATTERN!


This design on paper was SO000 easy to do, and it looks rather striking, yes? I used plain old manila paper (sort of yellow-tan).
Drawing gum is a masking fluid. I put a blob of it on the paper and blew it around through a drinking straw. Thus the branching lines.
When a few moments had passed, I gently washed with blue watercolor (dye would work, too), over the entire page. It turned greenish on the yellowish paper.
After that was dry, I rubbed the drawing gum off with my thumb. 

Monday, July 4, 2011

DECORATIVE PAPER MADE WITH INK AND TURPENTINE

I put down a layer of dye-based ink on a non-absorbent white sheet of paper. While the ink was still damp, I ran a brush through it, here and there, that I had soaked in turpentine.
This is the effect I achieved!

Monday, June 27, 2011

TWICE THE DECORATIVE PAPERS WITH TISSUE AND PAINT!

MATERIALS:
  1. Thin, inexpensive tissue papers.
  2. Dyes, liquid watercolors, dye-based inks, or thinned acrylic paints.
  3. Brushes.
  4. Smooth watercolor paper.
TECHNIQUE:
  1. Crinkle the tissue and spread it out over smooth watercolor paper.
  2. Slap on vivid, strong color right over the wrinkled tissue.
  3. Let dry overnight. (If the acrylic paint is not thinned enough, it may stick if left on for more than an hour or two.)
  4. When you remove the tissue, BOTH it and the watercolor paper should show wonderful batik-like patterns. If you are disappointed in the results, do try again with other tissues, papers, inks, or paint media.
The result is shown at right, below. The tissue used is at left.

Tuesday, June 14, 2011

MAKE YOUR OWN COLLAGE PAPERS WITH GOLD LEAF AND MORE!

To make my first example, I used a deli paper page I'd previously decorated with water and alcohol inks. I applied gold leaf to it (which looks brownish here).


Then I painted here and there with a glaze of orange acrylic paint.


For the next project, I first applied crackle medium to rigid paper, let it dry, and then painted it with acrylics. It looks rather nice this way, I think. But that's not all!
The gold leaf I added (after the paint was nearly dry) is an elegant counterpoint to the rough, crackled surface.